Maintenance Tracker
Introduction
MAINTENANCE TRACKER, or MTRACK, IS AN EASY-TO-USE SOFTWARE PROGRAM THAT WILL INCREASE PRODUCTIVITY, RELIABILITY, AND HELP YOU MEET REGULATORY REQUIREMENTS. In a nutshell, MTrack is very good at keeping track of information for plant maintenance that SAVES TIME AND MONEY. Unlike many other software programs for industrial maintenance, MTrack is oriented towards end users (the actual crafts-persons and their supervisors) and will increase their productivity. MTrack is not designed to be a bean counter. MTrack DOES NOT keep track of how long some job took, or how many widgets so and so withdrew from parts stock for Work Order 1994.12345. The designers of this program feel that this kind of data costs more time to enter than it could ever save. After all, time is money! However, there are plenty of "FREE FORM" and "MEMO" fields to record ANY data that you wish.
MTRACK IS A MODULAR PROGRAM. All of the modules are accessed via the MTrack Main Menu. Modules include Equipment/Job Tracker, Work Order Tracker, Parts Tracker, Tech Manual Tracker, Drawing Tracker, Report Printing, and utilities for printer setup, data backup, etc. All the modules use the same Pull-Down Menu interface complete with hot-keys for experienced users. Mice and other pointing devices are also supported. Function Keys are used in a consistent manner: <Esc> Back-Up or Quit, <Enter> Select & Proceed, <F1> Context sensitive help, on-line manual, <F2> List Choices, and <F10> Save Changes & Proceed.
MTRACK MODULES INTERACT... For example; There are fields for "Drawing #" and "Tech Manual" in Equipment/Job Tracker. While editing these fields, pressing <F2> will bring up a window containing Drawings or Tech Manuals that have been entered in Drawing or Tech Manual Tracker for you to choose from.
ON-LINE HELP! Context-sensitive help is available everywhere the cursor goes! Simply press <F1> for help. Need more help? Press <F1> again for the on-line manual. Need help on how to use the on-line manual? You guessed it--press <F1>. You can search the on-line index, table of contents, and even print the on-line manual.
SEARCH/INDEX and MULTI SEARCH? All MTrack modules use two distinct search methods. SEARCH/INDEX allows ordering the records using an INDEX, and SEARCHING based on the INDEXED Field(s). MULTI-SEARCH allows searching several key fields at the same time for a user entered string of characters.
WHAT WILL MTRACK DO? The most significant module of MTrack is the Equipment/Job Tracker. Equipment/Job Tracker works with both preventative maintenance (PM), and corrective maintenance (CM). It can be used to schedule PM and/or store data needed to perform any kind of maintenance in any kind of plant. From compressors to pressure transmitters, MTrack can handle anything. You can enter individual EQUIPMENT, such as "Traveling Screen No. 1", and JOBS that include many pieces of equipment, such as "Grease All Traveling Screens." Records that pertain to multiple pieces of equipment can have the individual equipment listed to form a checklist, or to specify some other details.
MTRACK USES AN ADVANCED FEATURE CALLED LOOK-UP TABLES. Look-Up Tables standardize entries to some of the database fields. This essential feature eliminates spelling and semantic differences, and speeds data entry. Imagine all the different names and (mis)spellings you could have for the same Area, Department, etc. Suppose you wished to print all the preventative maintenance due for the AREA "Tank Farm". If the AREA field in these records had entries such as "Oil Tank Farm" or "Tank Fram", they would probably never be found. That's why Look-Up tables offer a huge advantage. Obviously, the Look-Up Tables must contain entries before the other MTrack modules can accept data. You can easily edit the Look-Up Tables in the Validation Database to tailor them to your plant.
EQUIPMENT/JOB TRACKER IS COMPOSED OF THREE SECTIONS or WINDOWS. The first section of a record contains such things as a Tracker ID number, the name(s) for the Equipment/Job, the Area & Sub Area, Department, Drawing number(s), Last PM date, Interval, PM Due Date, etc. The form also contains 10 lines of "Free Form" data. This is typically used for equipment data, a calibration data form, brief work instructions, etc. The second section (window) is a "MEMO" field where you may include detailed work instructions, safety information, required tools, warranty information, etc. MTrack is a fully RELATIONAL DATABASE. Every record in the Equipment/Job Database may also have children.....more specifically, CHILD RECORDS. This third section (window) contains the chronological maintenance history for the PARENT record. Each History record contains fields for date, craftsperson's name, whether the work was PM or CM, plus 10 lines of "FREE FORM" data and a "MEMO" field for any additional information.
WHAT OTHER FEATURES DOES EQUIPMENT/JOB TRACKER HAVE? Features include quick printing of the main Equipment/Job record from the pull-down menu, or via a hot-key. There are filtered reports that can select individual records, records due for maintenance by a user-entered date, records for a Department and/or Area or entire maintenance groups. The printout can either be the full record or just a listing. Of course, the maintenance history for a given Equipment/Job can be printed also. The user can even select the date range to print! Any record can be assigned to a user-defined "Maintenance Group" such as "Unit 1 Overhaul". When it's time for "Unit 1 Overhaul", you can print all the forms for that group! This is also handy for any work most efficiently performed with other work. Ever go out to do a job, get all the tools and test equipment set up, do the work, put everything away.....then have to do it all again later, only a short distance from where you were a week earlier? Use this feature and minimize wasted time!
WHAT IS WORK ORDER TRACKER? Work Order Tracker neatly organizes your work orders. It can be used to track an existing paperwork system, or it can be used to generate a paper work order for the craftsperson. It can even be used in a paperless environment. Work orders can be submitted by personnel via a network, with others on the network either assigning or completing the work requested. Of course, a hard copy can be printed anytime it's needed. Fields include Equipment Name, Priority, Department, Area, Sub-Area, Submitted by, Assigned to, Submission date, Completed date, Problem/Work Requested, Work Performed, etc. Completed work orders can be left in the database for reference, though we recommend backing up to removable media and/or deleting unnecessary records. This will maximize performance and minimize space required on your fixed disk drive. Features include printing a single work order, a range of work orders, incomplete work orders, work orders for a particular department or area, or any combination of these.
WHAT ABOUT PARTS? Parts is parts... well, not quite. Parts Tracker is our simple solution for keeping track of what parts you have, what they're for, what you need to order, and where you order from. There are fields for Location, Mfg. of Part, Mfg. of Equipment, Part Number(s), Long and short descriptions, Category (uses a Look-Up), Quantity in stock, Re-order quantity, Amount on order, Price, Vendor information, etc. plus a "memo" field for other information such as safety data, shelf life, product specs, etc. Parts Tracker has a convenient ADD/SUBTRACT-from-stock window that automatically adjusts the quantity in stock, and features quick printing from the pull-down menu or via a hot-key. Select individual records, or use filtered reports to select records that are low in stock, or low in stock and not on order. As with all MTrack reports, they don't HAVE to go to the printer. You may simply view them one screen at a time on your computer monitor! Searching for a part is as simple as ABC, literally. Searches are performed alpha-numerically based on Mfg. of part, Mfg. of Equip, Part number(s), Vendor Company, Part ID#, or Part Category. "Part Category" uses a Look-Up table, and is the last resort when searching for a part that you can't find with the other fields. It typically uses generic categories such as "Fastener" or "Filter" to search by.
To those that are familiar with sophisticated warehouse software systems that store and report every transaction made and its purpose, this is a throwback to the 3x5 card systems used years ago. We'll take that as a compliment, thank you! Frankly, many 3x5 card parts departments ran more efficiently than some modern ones. Remember, all information costs money! Your company is paying for every keystroke on that blasted computer. If your company already has a parts database for its warehouse, or requires more sophistication, Parts Tracker is well suited to handle the new and used parts that a Maintenance Shop typically keeps in-shop.
WHAT IS TECH MANUAL TRACKER? It's an easy way for craftspeople to find those manuals quickly! In many plants, finding a manual at all is a time-consuming minor miracle. To use Tech Manual Tracker, simply put all your manuals in binders or file folders and give each a unique number, or alpha-numeric designation. The Manual Number may have a two character prefix that uses a Look-Up table (Window 2), and a one character suffix. Prefix and suffix use is optional, but is widely used to distinguish a plant or department to which the manual pertains. Now you can enter the manual number, manufacturer name, and the equipment description/model in the Tech Manual Tracker database. You may print or view Tech Manual Indexes sorted alphabetically by manufacturer or equipment description/model. Find any manual easily by searching with Tech Manual Tracker on your computer, or by browsing through the printed indexes!
CAN PLANT DRAWINGS BE EASIER TO FIND? Yes, in two ways. First, each Equipment/Job Record has two fields especially for drawing numbers. Second, DRAWING TRACKER will organize plant drawings using fields for Drawing Number, Sub-Area, Keyword, and Description. Keyword uses a Look-Up Table accessable from window 2, and Description is seventy-five characters long. Multi-Search is extremely effective here: simply enter a string of characters pertaining to the drawing and let Multi-Search find it for you!
CAN MTRACK RUN ON A NETWORK? You bet it can! MTrack is compatible with Microsoft, Novell, etc. MTrack can be run entirely from a network, with just the data files on the network, or from a stand-alone computer.
WINDOWS? MTrack is compatible with ALL versions of Windows, including Windows NT and 2000. MTrack has an Icon and a Shortcut (PIF) file.
WHAT FORMAT IS THE DATA STORED IN? All MTrack datafiles are DBASE IV (Xbase) compatible. Most database programs, spreadsheet applications can read Dbase files.
DOES MTRACK HAVE SECURITY FEATURES? Yes! Security is just as important as ease of use. MTrack uses a system of security levels to limit the ability of some users to modify data. Log-on names, passwords, and security level can all be changed by a user(s) with the highest security level. For ease of use, no "Log-on" or password is required for the lowest security level. This level (zero) allows viewing and printing for every module, adding or withdrawing parts from stock in Parts Tracker, and initiating a Work Order in Work Order Tracker. There are three additional levels that progressively give more responsibility and editing capability to the user.
On the soapbox...
INCREASED PRODUCTIVITY, RELIABILITY, MEETING REGULATORY REQUIREMENTS.....MTrack has been uniquely designed with these goals in mind. That sounds pretty basic--even obvious, but many a PM (or CMMS) programs do just the opposite! The developers of MTrack would like to offer some advice on using any system for maintenance management, and on plant maintenance in general:
1. Garbage in, garbage out. It's an old saying, but worth repeating. Make sure that what you enter in MTrack is correct. There once was a plant (no longer operational) that hired inexperienced temporaries to transcribe calibration data from a paper system to a computer based system (NOT MTrack). Naturally, the paper based system had different places to put the information than the computer based system. This computer based system was very restrictive about what could go where, and how many characters were allowed. (MTrack uses a "free form" area for things such as calibration data. You create the format!) To make a long story short, the temporaries were instructed to make the data fit the best they could. A lot of data was left out, or put in the wrong fields. The end result was not pretty.
2. Don't determine your PM's from a manual alone. Some manufacturers over-do their PM's because they have a long warranty and want to minimize the chance of failure, or maybe they hope to sell you whatever is necessary to do the PM. Other manufacturers don't recommend enough PM. Maybe your service is more severe than normal, or reliability is very critical to your plant. Don't assume that everything should be maintained to manufacturer's specs. Sometimes you'll have to maintain something to tighter tolerances than the manufacturer guarantees, many times you will require less.
3. Don't PM the kitchen sink! Often the best maintenance is corrective. "If it works, don't fix it" is sometimes the best method. The point is you CAN do too much PM. Remember the goal is not to NEVER have anything break, the goal is to increase productivity, insure reliability and meet regulatory requirements. MTrack works with corrective as well as preventative maintenance to help achieve these goals. You don't have to schedule a PM interval just because you put data for a piece of equipment in MTrack. The data may be used for corrective maintenance and recalled as necessary.
4. Here's a typical example of cost-effective maintenance management: An instrument measures the level in a reservoir. On a weekly basis, personnel check the reservoir level manually with a gauge board, which they compare with remote indication from the instrument. The manufacturer recommends calibration every year to maintain the guaranteed accuracy. Rather than do a PM calibration yearly, we would recommend simply calibrating when a problem is reported.
5. Use your maintenance staff to achieve the most efficient PM program possible. Encourage craftspeople to mark up the printouts, or edit and add to the database themselves. Information that's accurate, easy to find, and readily available will save you time and money.
It's strange, but often PM programs are either nonexistent, or they waste resources doing maintenance that is not cost effective and ignore maintenance that is! MTrack is here to help you work smarter, not harder.
Why use a DOS program in the twenty first century?
Before we answer that, ask yourself how many old Windows programs can still run on the latest versions of all flavors of Windows? Could you even un-install one after it thrashed your computer? A standard DOS program is the most compatible type of software available, and probably will be for some time. There are just too many critical applications in business and industry to ever succeed in the operating system marketplace without supporting standard DOS software. Industrial maintenance is a long-term business. Maintenance people don’t want to change maintenance software every couple of years. If you want to spend maintenance dollars maintaining equipment, and NOT ON THE MAINTENANCE SOFTWARE, Maintenance Tracker is your best choice!
Requirements and Installation
Requirements
To run Maintenance Tracker you will need a PC compatible computer with approximately twelve megabytes of available disk space. The program itself will not use all this space, but space is necessary for the datafiles (Dbase compatible). 528 K bytes of free memory are required. MS DOS version 3.0 or greater is required; version 5 or greater, Windows 9x, NT or 2000 or newer is recommended. MTrack requires FILES=80 (or greater) in the CONFIG.SYS (or CONFIG.NT). MTrack will run on your old obsolete computers, but she loves the fast new screamers available today.
Installation
ü DOS style
Insert Install Disk 1 in drive A or drive B. At a DOS prompt, make that drive the default drive by typing the drive letter followed by a colon, then <Enter>. Type INSTALL <Enter>.
ü Windows style
Insert Install Disk 1 in drive A or drive B. Type A:\INSTALL at the RUN command in the START menu, or double-click on INSTALL from within Windows Explorer.
ü Internet download style
Simply double-click on the downloaded file.
The program files will be installed to the directory C:\MTRACK by default. We strongly recommend using the default. Follow the instructions presented on the screen. After the main program files are installed, a read-me screen is displayed. Press <ESCAPE> to leave the read-me file, then press <ENTER> to start data file installation. (Caution: this step overwrites any previous MTrack data. Skip data file installation if you are re-installing and need to preserve your data.)
CONFIG.SYS and CONFIG.NT
You MUST have a FILES=80 (or greater) statement in either the C:\CONFIG.SYS file for DOS, Windows 3.x or 9x, or in C:\WINNT\SYSTEM32\CONFIG.NT for Windows NT or 2000. If the CONFIG.SYS file is not present, create it and add the FILES=80 statement. You can use Windows NOTEPAD.EXE to edit or create this file, or use the MTEDIT.EXE program that is included with Maintenance Tracker. To use MTEDIT, type C:\MTRACK\MTEDIT C:\CONFIG.SYS or C:\MTRACK\MTEDIT C:\WINNT\SYSTEM32\CONFIG.NT for Windows NT or 2000 at a command (DOS) prompt. You can also type this at the RUN command in the START menu from Windows. Check for a FILES= statement, change if necessary, save the file and exit the MTEDIT program. (Note that the above assumes the default locations for MTRACK and Windows NT/2000.)
Starting MTrack
Important Note: Before you can start entering data for your Equipment, Work Orders, etc. you must first add entries in the Validation database. MTrack uses this database to verify correct and valid data entry in some of the fields. We suggest you use the sample data and take the tutorial to familiarize yourself with the program before entering data for your particular plant or business. See Appendix A Maintenance Tracker Tutorial .
ü DOS style
Start Maintenance Tracker by typing MTRACK <Enter> or SAMPLE <Enter> at a DOS prompt from the drive\directory (e.g. C:\MTRACK) containing the MTrack program files. SAMPLE will use the sample data files.
ü Starting MTrack in Windows 9x, NT4, or 2000 by clicking on an Icon
View the C:\MTRACK directory in Windows Explorer. Find the file MTRACK with the little arrow in the MT ICON indicating it's a shortcut. If Explorer is hiding file extensions, there will be more than one MTRACK, look for that little arrow in the ICON. If you right click on the correct file and choose properties, you'll see a window with tabs called "General", "Program", "Font", "Memory", "Screen", "Misc". Now that you've found the shortcut file, simply COPY it. To add the Icon to the desktop, right-click on your desktop and click PASTE. Of course, the Icon can be added to your start menu in similar fashion.
ü Starting MTrack in Windows 3.x, or NT3.x by clicking on an Icon
To run MTrack from the icon, select a program group to add MTrack to. Select the File Menu, then "New", "Program Item", and "Browse". Find the MTRACK.PIF file (within the MTrack program directory) in the browse window and select it. Select "OK" to close the "Program Properties" window. Double clicking on the icon will start Maintenance Tracker.
Default Security Settings
Logon Names, Passwords, Security Level are initially set as follows:
Sysop MASTER 9 All Privileges
User2 2 2 Allows all database editing
User1 1 1 Limited Editing
If you don't log in, you have read only permission.
Networking
MTrack is network ready without additional upgrades! Record locking and file sharing is built in. There are two ways to run MTrack on a network and share a common set of data:
ü Network Method 1
Install MTrack on one computer (typically a server). Set up a 'share' for the C:\MTRACK directory and map that share to a drive letter on the client computers. Now add a shortcut (Windows PIF file) on the client computers to run the MTRACK.BAT file on the mapped drive. Now there is one last IMPORTANT detail. On each computer (using MTrack) add the following to the AUTOEXEC.BAT file SET MBSTN=XYZ where XYZ is a unique three-character combination. No files need to be installed on the client computers other than the shortcut.
ü Network Method 2
Install MTrack on every computer, copy one set of data files from the C:\MTRACK\DATA directory to one computer (typically a server), set up the server data directory to be shared with the clients, and map the share to a drive letter on each client. Now an IMPORTANT detail again: Edit the MTRACK.BAT file in the C:\MTRACK directory on each client to point to the shared data directory on the server. Complete instructions are in the batch file itself.
ü Choosing a Network Method
Both methods work very well. Method one will have one set of password security files, where method two has a set on each computer. Method two has a little less network overhead. Just remember to set the MBSTN variable with method one, or edit the MTRACK.BAT with method two. You can use MTedit, or Windows notepad to edit these files.
ü Network Permissions
Client users need write permission on the shared directories (both to create and modify files).
Location of DataFiles (e.g. Network Method 2)
The DataFiles may reside in any drive\directory (including a network drive). The installation default uses a sub-directory off the program directory named DATA (C:\MTRACK\DATA) for the data files. If you wish to use another directory for the DataFiles, you must edit the batch file (MTRACK.BAT) that starts Maintenance Tracker.
The data directory must contain the files MTRACK.MEN, MTRACK.MAN, *.DBF, *.DBT, *.K?? and *.NUM . If you want to relocate your data files, just copy everything in the DATA sub-directory to their new location, and edit MTRACK.BAT (in the MTRACK program file directory).
Default location of all MTrack files
C:\ [default drive for installation]
\MTRACK [program files]
\MTRACK\DATA [datafiles]
\MTRACK\DOCS [documents]
\MTRACK\SAMPLE [sample datafiles for tutorial]
\MTRACK\BACKUP [default backup directory]
Please use the default of C:\MTRACK if at all possible. If you must use a different drive or directory you will have to edit the MTRACK.BAT and SAMPLE.BAT files, plus edit the shortcut properties in MTRACK.PIF and SAMPLE.PIF.
Un-Install
Delete the MTrack directory and all sub-directories, and any shortcuts you manually copied. MTrack installation does not place any files in your Windows or DOS directories, or modify any configuration, registry files.
Startup options
-LCD for LCD Displays converts video to monochrome. -K suppresses detection of enhanced keyboards. Example: MTRACK -LCD <Enter> starts MTrack in monochrome mode. These are rarely needed options.
Default printer driver
Initially, the printer is set for "Generic", which will work with virtually all printers. This is what most users should leave selected. In the report screen you will select how many lines per page the printer defaults to. Almost all lasers and Ink-jet printers use 60, almost all dot-matrix printers use 66. The setting you last use will be remembered next time.
See the Printer Setup section for details on selecting a different print driver. The printer definition file is stored in the MTrack program file directory. Therefore, if the program files are located on a network drive, every user will have the same printer driver selected. In this situation, use the "Generic" driver.
Maintenance Tracker starts via a batch-file
Maintenance Tracker will only start when executed from a batch-file such as MTRACK.BAT or SAMPLE.BAT. Trying to start Maintenance Tracker any other way will result in an error message. In Windows, the shortcut with the MT Icon points to the same batch file. These batch-files contain the Path to the DataFiles as well as the commands to start Maintenance Tracker. The Windows shortcut (PIF file) also contains settings to optimize MTrack within Windows.
MTRACK.BAT is located in the directory where the Program Files were installed, so DOS users will have to change to the \MTRACK directory (installation default for the Program Files), then type MTRACK <Enter> to start MTrack. However, DOS users may start MTrack from any directory by copying MT.BAT (in \MTRACK by default) to a directory included on your DOS PATH statement (e.g. C:\DOS) in the AUTOEXEC.BAT file. This batch file changes drive and directory for you and runs MTRACK.BAT. For Windows users, the MTRACK shortcut (.PIF file) does all this for you (and more).
(Note for Experts: To restrict tampering with batch files, change their file attributes to "hidden" and "read only".)
Sample DataFiles and Tutorial
The installation default also copies a set of sample datafiles to a sub-directory off the program directory named SAMPLE (C:\MTRACK\SAMPLE). These sample datafiles are for use with the tutorial in Appendix A Maintenance Tracker Tutorial. To start MTrack with the sample datafiles:
ü DOS command prompt method
Type SAMPLE <Enter> from your MTRACK program directory (C:\MTRACK). .
ü From Windows Explorer
Double click on SAMPLE in the MTRACK program directory (C:\MTRACK). To toggle from a window to full screen and back, press <ALT> <ENTER>.
Accessing only Parts Tracker in the warehouse
Included in the MTrack program directory are the files PTRACK.BAT and PARTS.MEN. PTRACK.BAT has the same function, and is modified in the same fashion as MTRACK.BAT mentioned previously (see "Maintenance Tracker starts via a batch-file"). PARTS.MEN must be located in your MTrack DATA directory. When PTRACK.BAT is executed, Maintenance Tracker is started in a "parts only" mode. This may be desired in a network environment where warehouse personnel have no need to use the other modules of Maintenance Tracker. PTRACK.BAT can be put in a (network) directory that warehouse personnel have access to, and MTRACK.BAT can be placed in a (network) directory where only maintenance personnel have access. Both would have access permission to the directory where the Program and DataFiles were located. In this example, warehouse personnel would only be able to access Parts Tracker, and maintenance personnel would have access to all MTrack modules.
Default directory for backing up DataFiles
A sub-directory named BACKUP is also created off the MTRACK program directory. The BACKUP sub-directory serves as a default when backing up the datafiles.
Printer Setup
General Information
Start Maintenance Tracker. Logon as SYSOP with the password MASTER (MASTER is the default upon initial installation. See Menu item "Logon" for more details). From the main menu choose "Setup / Utility" then "Printer Setup". A window, called Printer Models Available, shows the name and model of printers for which there are descriptions. Scroll through the list. The window shows only four printers at a time.
There are many printers on the market. It is not possible to supply printer driver files for all brands and models, and future models may require different driver files. However, most printers use or emulate one of the listed printers. Instructions are included in the "Custom Printer Setup" section of this manual for creating or modifying custom printer definitions. MTrack is compatible with virtually any printer you can connect to your computer.
The printer drivers supplied are for the more common printers. If your printer is listed, use the cursor keys or the mouse to highlight your printer type and press S (select). MTrack will write the definitions required to drive your printer to a file called DBPRINT.DEF in your MTRACK program directory.
If your printer is not specifically listed, it probably emulates one that is. The "Generic" printer driver will work with any printer, but without special effects such as bold. See your printer documentation or take a guess.
Trouble Shooting Printer Problems
If your printer does not respond at all, check that it is on-line, connected properly and verify which port it is connected to. If the printer is connected to a serial port (COM1-4), make sure there is a MODE command included in the AUTOEXEC.BAT file to set the baud rate, parity, data and stop bits. The computer's serial port must be configured the same as the printer's serial port. For example; to set COM2 for 9600 baud, no parity, 8 data bits and 1 stop bit issue the command MODE COM2 9600,N,8,1. See your DOS manual for details on the MODE command. Also note that the quick print feature "Print Main Record" found on the Record Menu in Equipment/Job Tracker and Parts Tracker only uses the default printer port LPT1. LPT1 can also be re-directed to a COM port using the MODE command (e.g. MODE LPT1=COM2). For network printers that are re-directed via LPT1, specify LPT1 in the report filters.
The only special code this software sends to the printer is that for bold print. If your Report has bold in it, then the driver works! Note there are two exceptions: the HP Paint Jet and the Generic driver do NOT print bold. The Generic driver is the default as shipped, and works with any printer. If the line-drawing characters on the report look like a foreign language, you need to CHANGE the CHARACTER SET on your PRINTER. (This may be a menu choice from an LED display, or set with DIP switches on older printers; see your printer manual for the details.) The CHARACTER SET to use on your printer is often referred to as a GRAPHICS CHARACTER SET or PC-8. Most printers come with this as default, but often it is inadvertently changed. You won't notice until you print something that uses these LINE DRAW characters. 99% of the time you should leave your printer set up with this character set all the time! Many customers tell us this has solved printing problems with other software as well. An alternative is to set the field "Graphic Line Draw" to N[no] in the report filter at print time.
If your reports are not starting on the following page correctly, you need to set the LINES PER PAGE (in the report filter) to MATCH the printer's setting. (You can also adjust the printer's default lines per page setting if desired; it doesn't matter as long as the printer and the report filter are set alike.) Basically, the software needs to know how many LINES it can FIT on a PAGE! Remember, this is done from within each of the report filters at print time. The last setting used automatically becomes the default for subsequent reports. As a general rule, most dot matrix printers come from the factory set for 66 lines per page, and most laser printers come set for 60 lines per page. All printers allow this default to be adjusted; see your printer manual if necessary.
Some printers use a Lines per Inch (LPI) and a top & bottom margin setting. The following example shows how to calculate Lines per Page. The printer is set for 6 LPI with 1/4" top AND bottom margins. The paper is 11" long. Lines per Page = (11-1/4-1/4) times 6, which is 63.
If necessary, you can modify and/or add a printer definition by following the instructions in the Custom Printer Setup section of this manual.
Technical Support
Help System / Online Manual
You can get context-sensitive help for any Choice, Menu, or Prompt by typing <F1> . Typing <F1> again will take you to the Online Manual. Typing <F1> while in the Online Manual will get you help on the manual! At the bottom of the Online Manual window is a "Help Line" that shows how to get to the Overview <F8>, Index <F9>, Print functions <Ctrl>+[P], etc.
Troubleshooting
Be sure to check the appropriate section of the manual and Appendix D. For error messages such as NOT ENOUGH MEMORY, FILE(s) ARE MISSING, DISK MAY BE FULL, check the following:
q Verify that the CONFIG.SYS (or CONFIG.NT) file allocates enough FILE handles. A line setting FILES=80 (or greater) should be included in the CONFIG.SYS (or CONFIG.NT for Windows NT/2000). This the number one solution for most problems. See the section on CONFIG.SYS and CONFIG.NT.
q At a DOS prompt type CHKDSK <Enter>. You should have at least 500,000 bytes available on DISK, and no lost or missing files or clusters. The CHKDSK command also checks for available RAM memory. The line after TOTAL BYTES MEMORY indicates BYTES FREE. MTrack requires 540,672 Bytes Free (528 k). Run CHKDSK or MEM from a Windows DOS Prompt for accurate results under Windows.
q Rebuild ALL Indexes (MTrack Setup/Utility sub-menu). See the topic "Rebuild Indexes" in the index.
q If you run the DOS utility program SHARE.EXE (usually loaded in the AUTOEXEC.BAT or CONFIG.SYS), you may need to use the /F: and /L: parameters. e.g. SHARE.EXE /F:2048 /L:80 This example sets aside 2048 bytes for storage of file data, and allows 80 files to be locked at one time. See your DOS manual for details.
Support from Triska Technologies
Technical support is available by email and the Internet via our website at http://MTrackCMMS.com/.
Please supply the following information with any request for support
q Your company name, your name, and your voice and FAX telephone numbers and Email address.
q Your question, or a clear description of the problem and symptoms.
q The brand and version of the operating system on your computer and network (if applicable).
q Your CPU type (i486, Pentium, Pentium III, etc.) and brand of computer.
q If the problem is with printing, be sure and read the section Trouble Shooting Printer Problems . Know which port your printer is connected to, and if a network is involved. Check your printer operation from the DOS command line by typing COPY CONFIG.SYS LPT1 at the C:\> prompt. Substitute the actual port your printer is connected to for LPT1. If your printer still does not respond, the problem is with your computer or printer.
Quick Overview of MTrack Functions
Equipment / Job Tracker
q Record data or instructions for each Equipment or Job.
q Schedule Preventative Maintenance (PM).
q Group Equipment/Job records (for Event Driven Maintenance.)
q Equipment/Job History Database for Preventative and Corrective maintenance.
q Quick Printing of main record with <Alt>+<P>.
q Print reports * (to printer, file, or video). Reports for individual records. Reports can be sorted by Tracker ID, Department, or Area, and filtered by Department, Area, Sub-Area, Maintenance Group, or PM due date. Reports can be in either "list" or "full record" format. A report of the History records for any Equipment/Job can be filtered on a date range.
Technical Manual Tracker
q Organize technical manuals, easy searching for manuals.
q Print Indexes * (to printer, file, or video). Indexes can be based on Manufacturer, Description/Model, or Manual Number.
Work Order Tracker
q Record data or instructions for each Work Order.
q Organize Work Orders based on Priority, Area, etc.
q Print reports * (to printer, file, or video). Work Orders can be filtered by number, completion status, Department, or Area. Reports can be in either "list" or "full record" format.
Parts Tracker
q Easy Part searches
q Add/Subtract from stock window.
q Track Vendors.
q Quick Printing of main record with <Alt>+<P>.
q Print reports * (to printer, file, or video). Reports for individual records, records indicating low stock, or records indicating low stock and not on order.
Drawing Tracker
q Organize Plant Drawings, easy searching for drawings.
q Print Indexes * (to printer, file, or video). Indexes can be based on Drawing #, Sub-Area, or Keyword.
Items marked with * are executed via the "Print, Search, & Sort" sub-menu, then by selection of the applicable item.
Validation (Look-Up) Database
q Validate some of the data entered in other MTrack modules.
q Print the Look-Up tables (to printer, file, or video). *
Setup / Utilities
q Text file editor (MTEdit).
q Change the path to DataFiles.
q Change video settings.
q Rebuild Indexes.
q Printer Setup.
q Backup & Restore DataFiles.
q Import / Export Utility.
Items marked with * are executed via the "Print, Search, & Sort" sub-menu, then by selection of the applicable item.
The MTrack Main Menu
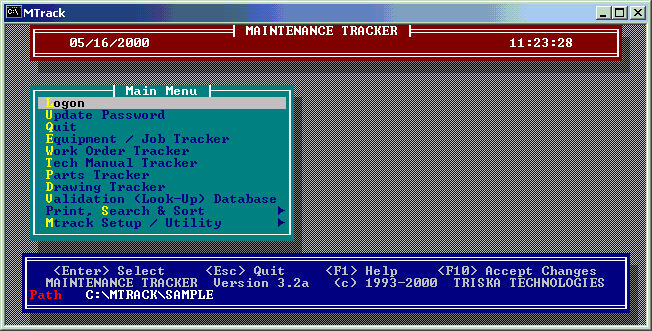
Menu Item "Logon" Activated by pressing "L" (Security)
A Logon is not required to view/print data, changing stock quantity in Parts Tracker, or to add new Work Orders in Work Order Tracker. A Logon is required where accidental damage to the integrity of your database is possible. Three security levels are used in Maintenance Tracker.
q Level 1 is for editing the Equip / Job, Tech Manual, Work Order, and the Parts Tracker.
q Level 2 adds rebuilding indexes, printer setup, setting default numbering of records added (Equipment/Job Tracker, Work Order Tracker, Parts Tracker) and adding records to the Validation (Look-Up) Databases.
q Level 9 adds data backup, updating security levels or passwords, changing or deleting records in the Validation (Look-Up) Databases, and the Import/Export utility.
An inactive menu item or prompt indicates that your security level is not high enough for that item; ask your Sysop for details. After installation, the default names and passwords are:
q Level 9 Logon name is SYSOP with the password of MASTER
q Level 2 Logon name is USER2 with the password of 2
q Level 1 Logon name is USER1 with the password of 1
There can be as many LOGON names (each with password and security level) as desired.
CHANGE THESE PASSWORDS AFTER INSTALLATION!
To Log-off, press <Alt>+<L> to Logon, then press <Esc> twice to abort the Logon. Security level will now be at zero. It is not necessary to Log-Off if you are quitting MTrack.
IMPORTANT ADVICE: Level 1 is for the typical user who is allowed to enter and edit most of the data in MTrack. Because security levels 2 and 9 allow editing the Validation Database, ONLY those users responsible for the administration of this program should be allowed access at these levels. Only the most capable and responsible users should be allowed access at Level 9.
This may seem like overkill if you are the only person who is going to use MTrack. However, the program is designed to be used by many people, perhaps on a network, some of whom may have little or no training. Also keep in mind that any user who can access the DOS command line (or equivalent) can delete files on the computer. To prevent this, run MTrack from a security menu program which starts automatically on boot-up of the computer. We recommend a product called Direct Access from Fifth Generation Systems. Your network software may also have appropriate security features.
Menu Item "Update Password" Activated by pressing "U"
Allows every user to update their own password, and the SYSOP (or anyone with security level 9) to add or delete users, change passwords, and change security levels. A security level (Logon) is not required to view or print in MTrack. A security level of 1 allows editing in all but the Validation Database. If you have logged on as the SYSOP (with security level 9), you may choose to update the PASSWORD DATABASE by typing 1 <Enter>, or update the MASTER PASSWORD by typing 2 <Enter>.
1. The PASSWORD DATABASE allows the SYSOP or anyone else with security level 9 to add or delete users, set a user's security level and assign or change passwords. One user is displayed at a time; use the menu at the lower portion of the screen to display other users and edit as necessary.
2. The MASTER PASSWORD is used only for the logon name of SYSOP and is initially set to MASTER. Users other than SYSOP with security level 9 may change their password from the PASSWORD DATABASE. (Usually SYSOP is the only security level 9 user.)
Menu Item "Quit" Activated by pressing "Q"
Selecting this will QUIT Maintenance Tracker. Pressing <Alt> +<X> will also allow terminating the program.
Menu Item "Equipment / Job Tracker" Activated by pressing "E"
This starts the Equipment/Job Tracker module. See the table of contents under "Equipment/Job Tracker" for details of operation. Security level 1 is required for any editing; level 2 is required to edit a Tracker ID number or to set the default Tracker ID number for the next record added to the database. Printing of filtered reports is done via the "Print, Search & Sort" menu item. A mouse will emulate the <arrow> keys (left button for <Enter>, right for <Esc>). The Validation (Look-Up) Database must have data prior to using this database!
Menu Item "Work Order Tracker" Activated by pressing "W"
This starts the Work Order Tracker module. See the table of contents under "Work Order Tracker" for details of operation. No security level is required to ADD a Work Order and edit those fields consistent with submitting a Work Order. Security level 1 is required for editing the remainder of the fields (except Work Order number) or to EDIT AN EXISTING WORK ORDER. Level 2 is required to edit a Work Order number, or to set the default Work Order number for the next record added to the database. Printing of filtered reports is done via the "Print, Search & Sort" menu item. A mouse will emulate the <arrow> keys (left button for <Enter>, right for <Esc>). The Validation (Look-Up) Database must have data prior to using this database!
Menu Item "Tech Manual Tracker" Activated by pressing "T"
This starts the Tech Manual Tracker module. See the table of contents under "Tech Manual Tracker" for details of operation. Security level 1 is required for editing in Tech Manual Tracker. Security level 2 is required to ADD entries to, and level 9 is required to change entries in the PREFIX Look-Up Table (window 2). Printing of filtered reports is done via the "Print, Search & Sort" menu item. A mouse will emulate the <arrow> keys (left button for <Enter>, right for <Esc>).
Menu Item "Parts Tracker" Activated by pressing "P"
This starts the Parts Tracker module. See the table of contents under "Parts Tracker" for details of operation. No Security level is required to add to or subtract from the "Quantity in Stock". Security level 1 is required for editing the rest of the fields, except for "Part ID number". Level 2 is required to edit a Part ID number, set the default Part ID number for the next record added to the database, and to ADD entries to the CATEGORY Look-Up table. Level 9 is required to change existing entries in the CATEGORY Look-Up table. Printing of filtered reports is done via the "Print, Search & Sort" menu item. A mouse will emulate the <arrow> keys (left button for <Enter>, right for <Esc>). The Category Look-Up Table must have some entries prior to adding parts records to this database!
Menu Item "Drawing Tracker" Activated by pressing "D"
This starts the Drawing Tracker module. See the table of contents under "Drawing Tracker" for details of operation. Security level 1 is required for editing in Drawing Tracker. Security level 2 is required to ADD entries to, and level 9 is required to change entries in the KEYWORD Look-Up Table (window 2). Printing of filtered reports is done via the "Print, Search & Sort" menu item. A mouse will emulate the <arrow> keys (left button for <Enter>, right for <Esc>).
Menu Item "Validation (Look-Up) Database" Activated by pressing "V"
This starts the Validation (Look-Up) Database module. See the table of contents under "Validation Database" for details of operation. Security level 2 is required to add a new entry to a Look-Up table in the Validation Database. Security level 9 is required to change an existing entry in a Look-Up table. Printing of filtered reports is done via the "Print, Search & Sort" menu item. A mouse will emulate the <arrow> keys (left button for <Enter>, right for <Esc>).
Menu Item "Print, Search & Sort" Activated by pressing "S"
Print to the screen (CONsole), DSKfile or to your printer. Allows searching and sorting the databases. If you print to a DiSKfile, you may use the Text File Editor (Set-Up / Utility) to browse through the records in the file. Printer control codes (such as bold) are not sent to DiSKfiles. They may be edited in any text editor or word processor. The "Lines per page" setting should still match the printer's if the DiSKfiles will be printed directly from DOS.
See the table of contents under "Reports" for general information on reports, and details on each report filter.
- Sub-Menu Item "Equipment/Job Record Searches & Sorts" Activated by pressing "E".
Select records based on Area, Sub-Area, Department, or PM Due date.
q "Equipment/Job Record Searches & Sorts", Full Record Report Activated by pressing "F". The entire record (one per page) is printed (to printer, screen, or disk).
q "Equipment/Job Record Searches & Sorts", List Format Activated by pressing "L". A list is printed (to screen, printer, or a file) consisting of Tracker ID, Area, Sub-Area, Department, Unit, Name, ID or Name 2, and System. This makes a good check-off list to print along with the Full Record Report.
- Sub-Menu Item "Equipment/Job Record Searches by Group" Activated by pressing "G"
Select records based on their Group. Also allows restricting records by Department & Area.
q "Equipment/Job Record Searches by Group", Full Record Report Activated by pressing "F". The entire record (one per page) is printed (to printer, screen, or disk).
q "Equipment/Job Record Searches by Group", List Format Activated by pressing "L". Lists the records, several per page. Includes Area, Sub-Area, Department, Unit, Name, ID or Name 2, and System. This makes a good check-off list.
- Sub-Menu Item "Equipment/Job History" (Report) Activated by pressing "H"
Select records from the Maintenance History Database. Allows selection by Tracker ID and a Date Range.
- Sub-Menu Item "Work Orders" (Reports) Activated by pressing "W"
Select work orders and an output destination. You may choose either the Full Record report, or the List Format.
q "Work Orders (Reports), Full Record Format" Activated by pressing "F". Allows selection of any work order, range of work orders (by their work order number), completion status, Area, or assigned Department. Records can be printed to console, printer, or diskfile.
q "Work Orders" (Reports), List Format" Activated by pressing "L". Allows selection of any work order, range of work orders (by their work order number), completion status, Area, or assigned Department. Records can be printed to console, printer, or diskfile.
- Sub-Menu Item "Tech Manual Indexes" Activated by pressing "T"
Select the sort order and destination for Technical Manual database reports. These are typically used as printed indexes for your library of technical manuals. You may sort by Manual Number, Manufacturer, or Model/Description.
- Sub-Menu Item "Parts Records" Activated by pressing "P"
Select records based on low quantity in stock, low stock and not on order, or a single record of your choice. Also choose the report destination (screen, file, or printer).
- Sub-Menu Item "Drawing Indexes" Activated by pressing "D"
Select the sort order and destination for Drawing Tracker database reports. These are typically used as printed indexes for your library of plant drawings. You may sort by Drawing Number, Sub-Area, or Keyword. You may also filter the report based on Sub-Area.
- Sub-Menu Item "Look-Up Tables" Activated by pressing "L"
Select which Look-Up Tables from the Validation database to include in the report, and the report destination (screen, file, or printer).
Menu Item "MTrack Setup / Utility" Activated by pressing "M"
Text file editor (MTEdit), Change the path to data files, Rebuild the Database indexes, Printer Setup, Data file backup, and an Import/Export Utility.
- Sub-Menu Item "Text File Editor (MTEdit)" Activated by pressing "T"
MTEdit is a full featured text editor that is perfect for viewing (and editing) reports sent to a disk file as well as editing batch files, CONFIG.SYS, AUTOEXEC.BAT etc. on your computer. With MTEdit you can view and edit multiple files in different, sizable windows. Other features include cut/copy/paste from an editable clipboard, search & replace, background printing of files, and a simple menu driven interface with hot-keys. You can use MTEdit outside of Maintenance Tracker also. The file name is MTEDIT.EXE. Copy it to a directory on your DOS path statement in the AUTOEXEC.BAT (e.g. C:\DOS) for quick access.
MTEdit Hints: To resize a window with a mouse, drag the lower right corner. To resize a window with the keyboard, select "Size/move" from the "Window" menu, then hold the <Shift> key while pressing the <Arrow> keys, finally pressing <Enter> to end the resize operation. To move a Window with a mouse, drag the top to the desired location. To move a Window with the keyboard, select "Size/move" from the "Window" menu, use the <Arrow> keys to position, then press <Enter>. To make a Window the active window either click on it with a mouse, or select "Next" <F6> or "Previous" <Shift>+<F6> from the "Window" menu. Files are printed in the background, from a file on disk. When editing, save the file to disk prior to printing. If starting MTEdit from the command line, the file(s) to open can be specified as parameters to MTEDIT. (e.g. MTEDIT C:\CONFIG.SYS C:\AUTOEXEC.BAT )
- Sub-Menu Item "Set Data Path" Activated by pressing "S"
Allows the user to manually change the path to the data files. This can be used to switch between different sets of data files. The current path being used by MTrack for the data files is displayed at the bottom of the MTrack Main Menu screen. The initial path to the data files must be set by the BatchFile that you use to start Maintenance Tracker. If you move the data files, edit the BatchFile (MTRACK.BAT) as per the instructions contained in the BatchFile (as REMarks). The MTrack utility MTEdit is ideal for this. The default location for the data files is a sub-directory named DATA off the MTrack program directory. Note that the files MTRACK.MEN and MTRACK.MAN must also exist in the same directory as the data files. Data files have the suffixes .DBF , .DBT , .K?? , .MEN and .NUM .
- Sub-Menu Item "Video Settings for Database" Activated by pressing "V"
Item requires a security level of at least 2
Allows setting of video colors for active, inactive, currently editable text, as well as altering the display to eliminate "snow" on older CGA monitors.
- Sub-Menu Item "Rebuild Indexes" Activated by pressing "R"
Item requires a security level of at least 2
Rebuilding Indexes may be required if the computer is shut off prior to the program saving its files. Try this whenever a database will not start properly.
q "Rebuild Indexes", Equipment / Job Tracker Activated by pressing "E". Rebuilds the indexes for the Equipment/Job database. Press <F 10> from the Rebuild Program main screen to start the process.
q "Rebuild Indexes", Work Order Tracker Activated by pressing "W". Rebuilds the Indexes for the Work Order database. Press <F 10> from the Rebuild Program main screen to start the process.
q "Rebuild Indexes", Tech Manual Tracker Activated by pressing "T". Rebuilds the indexes for the Tech Manual database. Press <F 10> from the Rebuild Program main screen to start the process.
q "Rebuild Indexes", Parts Tracker Activated by pressing "P". Rebuilds the Indexes for the Parts Tracker database. Press <F10> from the Rebuild Program main screen to start the process.
q "Rebuild Indexes", Drawing Tracker Activated by pressing "D". Rebuilds the indexes for the Drawing Tracker database. Press <F 10> from the Rebuild Program main screen to start the process.
q "Rebuild Indexes", Validation Database Activated by pressing "V". Rebuilds the Indexes for the Validation database. Press <F 10> from the Rebuild Program main screen to start the process.
- Sub-Menu Item "Printer Setup" Activated by pressing "P"
Item requires a security level of at least 2
Sets up Maintenance Tracker to work with your printer. Note that reports sent to a DiSKfile do not include any formatting codes (such as bold). Use the arrow keys to hi-lite a printer, then type S (for select), then <Enter> to confirm the selection. Type Q to QUIT, then <Enter>. If your printer (or a close relative) is not listed, select GENERIC, or see the Printer Setup, Troubleshooting section in the Manual (on-line or printed version).
- Sub-Menu Item "Backup Data Files" Activated by pressing "B"
Item requires a security level of 9
Backup copies your data files to the drive and directory of your choice. To save disk space, the Index files are not backed up because they can always be rebuilt. The Source for the backup will automatically be your MTrack data directory. The Destination will be supplied by you. In a network environment backing up is usually done automatically. The MTrack backup and restore utilities are provided for stand-alone computers that are not backed up regularly by any other method. You can backup to either removable, fixed disks, or mapped network drives.
CAUTION: In a Network environment all other users should be logged off Maintenance Tracker during backup or restore.
If you have to use your backup files you can use the Restore utility which overwrites your current files, or you can copy the backup files to a directory on your hard disk. You can use the "Set Data Path" option (Setup/Utility menu) to have MTrack access a different directory for Data Files. Rebuild all the Indexes (Setup/Utility menu) prior to using the Data Files from a backup.
- Sub-Menu Item "Restore Data Files, Destroy current" Activated by pressing "D"
Item requires a security level of 9
CAUTION: This process DESTROYS the current Data Files! After selection, you will enter the source directory you wish to restore from. The destination is automatically set to your current MTrack data directory. In a Network environment all other users must be logged off Maintenance Tracker during restoration.
- Sub-Menu Item "Import / Export Utility" Activated by pressing "I"
Item requires a security level of 9
This utility allows exporting (and importing) of data to and from delimited text files. This is for advanced users only! See the chapter Import/Export Utility for more information.
The MTrack Command Menu (Database Menus)
MTrack Database Terminology
This is a good time to explain the terms (Data)FILE, RECORD, and FIELD. A FILE is a collection of RECORDS, and a RECORD is made up of one or more FIELDS. For example, in Tech Manual Tracker the Tech Manual FILE has three FIELDS per RECORD. The fields are Manual Number, Manufacturer and Description/Model. In Equipment/Job Tracker there are three FILES, the Main Record, Notes for the Main Record, and Equipment/Job History.
If there is more than one (Data)FILE in a module, as in Equipment/Job Tracker, the File Menu contains the choices (with the equivalent hot-keys) for moving though the FILEs. If you <PageDown> from the Main Record in Equipment/Job Tracker, a window appears with the Notes for that Equipment/Job. If you <PageDown> again, a window appears with the first History record for that Equipment/Job. Each window in MTrack displays the records in one FILE, and although more than one window may be present on your screen, only the window in the foreground is active.
The Record Menu contains the choices (with the equivalent hot-keys) for moving though the records in the selected file. There are actually two hot-keys for getting to the Next and Previous Records. <Ctrl>+<RightArrow> or <LeftArrow> will work all the time. <UpArrow> and <DownArrow> will work when a Menu is not pulled down. When a Menu is pulled down, the <UpArrow> and <DownArrow> keys move the Menu cursor. The Next or Previous record is based on what index was last selected. For example, in Equipment/Job Tracker the default index for Main Records is by Tracker ID number. However, if you select an index ordering records by PM due date, then the Next or Previous record is based on the record's PM due date.
MTrack is a relational database. There is a parent-child relationship between an Equipment/Job record and it's Equipment/Job Notes, and between an Equipment/Job record and it's Equipment/Job History. They are linked together by their common Tracker ID Number. There is a One-to-One relationship between an Equipment/Job record and it's Notes, and a One-to-Many relationship between an Equipment/Job record and it's History. In other words only one Note is allowed per Equipment/Job record, but it may have many History records associated with it.
General Information
This is an outline of the typical pull-down menu system used throughout the database modules in Maintenance Tracker. Throughout Maintenance Tracker mouse movement emulates the <Arrow> keys on the keyboard; the left mouse button is the same as <Enter> and the right button is the same as <Esc>.
File hot-key Record hot-key Edit hot-key
Next PgDn Next Ctrl-Rarr Add Ins
Previous PgUp Previous Ctrl-LArr Edit Ctrl-Enter
Exit Alt-X First Home Copy Ctrl-C
Screen Saver Alt-V Last End Delete Del
Search/Index Alt-S
Multi Search Alt-M
Menu Item "File - Next" Hot Key "<PageDown>"
Progress DOWN the file hierarchy: e.g. from the Main MTrack Equip / Job Record file to its Notes Record, or from the Notes to the History Record file for that Tracker ID.
Menu Item "File - Previous" Hot Key "<PageUp>"
Progress UP the file hierarchy: e.g. from the History Record file to the Notes Record, then to the Equip / Job Record, always linking on the Tracker ID.
Menu Item "File - Screen Saver" Hot Key "<Alt>+<V>"
Set the time for the Screen Saver to activate. The default is 0 (never activate), which is best for use in Windows.
Menu Item "File - Exit" Hot Key "<Alt>+<X>"
Exit from the running module and return control to the MTrack main menu.
Menu Item "Record - Next" Hot Key "<Ctrl>+<RightArrow>".
Hot Key NOTE: If a MENU is NOT pulled-down, you may use the <DownArrow> key also.
Display the Next record in order of Index key sequence from the active file (window). If the active file is linked to a parent file in a Many-To-One relationship, then the Next record will be the next one that shares the same parent as the current record. If there is no Next record, a beep will sound.
Menu Item "Record - Previous" Hot Key "<Ctrl>+<LeftArrow>".
Hot Key NOTE: If a MENU is NOT pulled-down, you may use the <UpArrow> key also.
Display the Previous record, in order of Index key sequence from the active file (window). If the active file is linked to a parent file in a Many-To-One relationship, then the Previous record will be the previous one that shares the same parent as the current record. If no Previous record can be found, a beep will sound.
Menu Item "Record - Search / Index" Hot Key "<Alt>+<S>"
Search for a record(s) in the current file, and display in the window. Searching uses an Index Key (Search Key) to sort the Records. The Records REMAIN in the order selected after a Search. This is very handy when you are looking for more than one Record. The Index Key may be a based on a single field (e.g., Model #), or on several fields (e.g., Dept...). If a Index Key is based on more than one field, the Index Key is said to be "segmented". For example, the "Dept..." Index is segmented. It is based on DEPARTMENT, AREA, SUB-AREA, UNIT NO, EQUIPMENT NAME. When this Index is active, the Records are displayed in this (alpha-numeric) order: DEPARTMENT, then the Records with the same DEPARTMENT ordered by AREA, then the Records with the same DEPARTMENT and AREA ordered by SUB-AREA, etc. This pattern continues until it finally ends with EQUIPMENT NAME. This works similar to a telephone directory where names are ordered by last name, then those with the same last name are ordered by first name, then those with the same last and first name are ordered by middle initial. The segments of an Index (if any) are displayed at the top of the RECORD LIST WINDOW, which may be displayed during the Search.
After selecting the Search function, you must select which Index Key you wish to use. Once a Index has been selected, you may specify the Key value to Search for. (Press <Enter> to display the RECORD LIST WINDOW beginning with the first record in the Index.) In the case of a Segmented Index, specify a value for the FIRST field in the Index Key. If a single match is found, then that Record will be displayed. If a Key value was specified and a number of matches are found, or no match was found, then the records are displayed in the RECORD LIST WINDOW . The records will be in the order of the Index selected, with the cursor on the closest match. The RECORD LIST WINDOW can be expanded to full screen with <Alt>+<Z>, re-sized, scrolled left and right as well as up and down. See the help line at the bottom of the window. To select a record, position the cursor and press <Enter>.
Menu Item "Record - Multi Search" Hot Key "<Alt>+<M>"
Multi Search will search several fields in each record, in order of the current Index, for a string of characters you enter. The fields searched vary between modules. In Tech Manual and Drawing Tracker ALL the fields are searched. In Equipment/Job, Work Order, and Parts Tracker, several of the main fields are searched. Press the Help Key <F1> while the cursor is on the Multi Search menu item to view which fields are searched. Multi Search looks for a character pattern match anywhere within the searched fields; e.g. searching for "ING" would include "SearchING", "INGersol", etc. Any character, even a "space", can be included in the search. (All searching is case insensitive.)
Menu Item "Record - First" Hot Key "<Home>"
Locate and Display the FIRST record in order of Index key sequence in the active file (window). If the active file is linked to a parent file in a Many-To-One relationship then the Top record will be the First one that shares the same parent as the current record.
Menu Item "Record - Last" Hot Key "<End>"
Locate and display the LAST record in order of Index key sequence in the active file (window). If the active file is linked to a parent file in a Many-To-One relationship, then the Last record will be the Last one that has the same parent as the current record.
Menu Item "Edit - Edit" Hot Key "<Ctrl>+<Enter>"
Edit (change) data in the record currently displayed in the active window. At any stage the Edit function may be aborted by pressing the <Esc> key.
Menu Item "Edit - Add" Hot Key "<Insert>"
Add a new record to the active file (window). At any stage the Add function may be aborted by pressing the <Esc> key.
Menu Item "Edit - Copy" Hot Key "<Ctrl>+<C>"
Copy the currently displayed data from the active window to a new record, which you will then edit. At any stage the Copy function may be aborted by pressing the <Esc> key. (Note/Memo fields will not be copied. See Appendix D.)
Menu Item "Edit - Delete" Hot Key "<Delete>"
Delete the record currently displayed in the active window and display the next available record after deletion. You are asked to reconfirm when Delete is chosen. If the file is linked in a One-To-Many, or a One-To-One relationship, to any child files, then all linked records in all such child files will also be deleted automatically to ensure database integrity. In other words, deleting an Equipment / Job Record will delete all of its History Records.
MTrack Database Modules
Equipment/Job Tracker (EQDB)
General Information
Equipment/Job Tracker Features
q Record equipment data, specifications and document job/work instructions.
q Provide easy methods to search and find records.
q Schedule preventative maintenance.
q Group Equipment/Job records for event driven maintenance.
q Allow recording of the maintenance history (in detail if desired) for each Equipment/Job Record
q See the section titled "Reports" for information on filtered and sorted reports in either a list or full record format.
Please refer to the section titled "The MTrack Command Menu (Database Menus)" for a description of MTrack database terminology, searching for RECORDS, and selecting FILES (WINDOWS) or RECORDS.
Equipment/Job Tracker has three FILES and three WINDOWS. The first FILE (or WINDOW) is called the Main Record, which can be printed quickly by pressing <Alt>+<P>. It stores the name, data, specifications, etc. for the Equipment or Job. It also has fields (Area, Sub-Area, Department, System, Equipment Type, and Group) that use a LOOK-UP in the Validation Database. The Validation Database must therefore have data entered in the LOOK-UP TABLES before Equipment/Job Tracker can be used properly. The second FILE (or WINDOW) is really an extension of the first. It contains a "Notes" field where you can jot down anything that is not conveniently put in the Main Record. It uses word wrap just like a word processor. The third FILE (or WINDOW) contains the History Records for the Equipment or Jobs.
If you <PageDown> from a Main Record you will see its Notes (if any). If you <PageDown> again, the first History Record for the Equipment/Job is displayed. Here you may browse through the History for that Equipment/Job, or search the entire History database. For example, you may search through all maintenance history by date or craftsperson name. After performing a PM, update the Main Equipment/Job Record field "PM Due Date" THEN add a History record if desired. This will cause the default date for the new History Record to be correct.
There are a wide variety of reports available under the "Print, Search & Sort" menu item (on the Main Menu). When selecting records by PM Due Date, we suggest you set the date in the report filter ahead of the current date so that you won't just select records that are overdue, but records that are about to become due. See the table of contents under "Reports" for more details.
Security level 1 is required for any editing, level 2 is required to edit a Tracker ID number, or to set the default Tracker ID number for the next record added to the database.
The following list describes all the fields in each FILE (or WINDOW).
File (Window) 1 Fields [Equipment/Job Record]
While file 1 is active you may search/index on:
Tracker ID Area .. PM Due date
MFG Model
Dept .. Name ID or Name 2
Dept .. System Group 1
Dept .. PM Due date Group 2
Area .. Name Group 3
Serial Number Equipment Type
Sub-Area .... PM Due Date
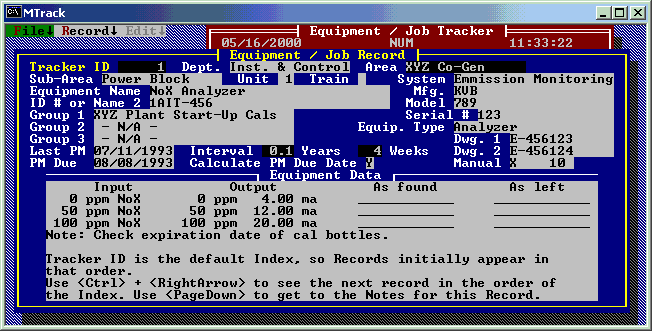
Field Name: Tracker ID
To edit this field you require a security level of 2
Tracker ID is (must be) a unique number assigned to each Equipment/Job Record. The number is assigned by the program, and may be changed only if your security level is at least 2. The default is one greater than the last record added (or aborted). The default may be reset (with security level 2) from the EDIT menu.
Field Name: Department
To edit this field you require a security level of 1
Department is the workgroup responsible for the Equipment or Job. This field has a Look-Up in the Validation Database. Entering any invalid data will bring up a LIST box to choose from.
Field Name: Sub Area
To edit this field you require a security level of 1
Sub-Area is the physical location for the Equipment or Job. This field has a Look-Up in the Validation Database. Entering any invalid data will bring up a LIST box to choose from. Sub-Area will fill in the appropriate Area field for you (from the Validation Database).
Field Name: Area
This field is automatically filled in based on the chosen Sub-Area.
Field Name: Unit Number
To edit this field you require a security level of 1
Unit is only used when a Sub-Area has Equipment identified by a Unit number. If the Equipment is not for a specific Unit, leave it blank (0).
Field Name: Train
To edit this field you require a security level of 1
Train is only used when a Sub-Area has Equipment identified by Train (e.g. A or B). If the Equipment is not for a specific Train, leave it blank.
Field Name: System
To edit this field you require a security level of 1
System is the LOGICAL location for the Equipment or Job. This field has a Look-Up in the Validation Database. Entering any invalid data will bring up a LIST box to choose from. An example of a LOGICAL location is a "Service Air" system. This system may be piped through many PHYSICAL Sub-Areas (such as Tank Farm or Power Block). This organization helps to sort records for the user.
Field Name: Equipment Name
To edit this field you require a security level of 1
The Equipment Name can also be a JOB DESCRIPTION. You should use a name that is commonly understood in your Plant. Save any ID numbers for the next Field ID # or Name 2.
Field Name: ID Number or Name 2
To edit this field you require a security level of 1
The Equipment ID # or Name 2 can also be a JOB DESCRIPTION. You should use a Name or Number that is commonly understood in your Plant. This field is optional.
Field Name: Group 1 (Group 2 & Group 3)
To edit this field you require a security level of 1
Groups can be used in many ways. They essentially tie all records together that have the same Group ENTRY in one of their Group fields. Each record can belong to up to three Groups. All the records in a Group can be printed (to DiSK, CONsole, or PRiNter). This is very useful for EVENT driven maintenance (as opposed to TIME driven maintenance where a PM Due Date might suffice). It can also keep maintenance that is efficiently performed together, in Groups. This field has a Look-Up in the Validation Database. Entering any invalid data will bring up a LIST box to choose from. An entry in for " N/A " should exist in the Validation Database.
Field Name: Last PM Date
To edit this field you require a security level of 1
Enter the date the LAST PM (not CM or Corrective Maintenance) was performed, or leave the field blank. Do this PRIOR to updating the HISTORY files and the PM Date will appear as the default date in the next HISTORY record for this Equipment or Job.
Field Name: PM Interval in Years
To edit this field you require a security level of 1
Enter a PM Interval in Years (or Weeks). Leave one field blank and the other will be calculated. For monthly items either use 4 or 5 weeks. By calculating the PM Due Date based on weeks (a year is defined as 52 weeks) we keep the Due Date on the same day of the week! Note that if you schedule your present monthly PM's to every 5 weeks you'll do 1.6 PM's less per year. That's a 13% SAVINGS in time and materials! If you must use 4 weeks (equivalent to February), you will do 1 extra PM per year (8%).
Field Name: PM Interval in Weeks
To edit this field you require a security level of 1
Enter a PM Interval in Weeks (or Years). Leave one field blank and the other will be calculated. For monthly items use either 4 or 5 weeks.
Field Name: Calculate PM due date Y/N
To edit this field you require a security level of 1
Enter Y or N . This will enable or disable the Auto Calculate feature. If the Entry is N , you will be able to set the PM Due Date manually.
Field Name: PM Due Date
To edit this field you require a security level of 1
This field will be calculated for you if "Calculate PM Due Date" is "Y" (Yes). If you wish to set the date manually (to get a PM on a particular schedule for example), enter "N" in "Calculate PM Due Date". This will keep your interval saved, and allow you to set the next Due Date.
Field Name: Manufacturer
To edit this field you require a security level of 1
MFG is an optional field. This field has a Look-Up in the Validation Database. Entering any invalid data will bring up a LIST box to choose from.
Field Name: Model
To edit this field you require a security level of 1
Model is an optional field. Use it as a reference for the users of this program.
Field Name: Serial Number
To edit this field you require a security level of 1
Serial # is an optional field. Use it as a reference for the users of this program.
Field Name: Equipment Type
To edit this field you require a security level of 1
Equip. Type is an optional field. This field has a Look-Up in the Validation Database. Entering any invalid data will bring up a LIST box to choose from. An Entry of " N/A " should be available for selection. This allows indexing based on Equip. Type, which may be useful in finding similar records to copy when adding a new record. This can save a lot of typing!
Field Name: Drawing 1 & Drawing 2
To edit this field you require a security level of 1
Dwg. 1 & 2 are optional fields. Use them as a reference for the users of this program.
Field Name: Manual
To edit this field you require a security level of 1
Manual is an optional field. Put in the applicable manual number from Tech Manual Tracker.
Field Name: Equipment/Job Data (10 lines)
To edit this field you require a security level of 1
Equipment/Job data is an optional field. This is a free form area with ten lines to use as necessary. Most Records need some sort of data, such as calibration data, settings, instructions, etc. It will print just as it looks, so this can also be a form for recording data. The Note field in the next Window is better suited to procedures, safety info, etc.
File (Window) 2 Fields [Equipment/Job Notes]
While file 2 is active you may search/index on: Tracker ID
Field Name: Equipment/Job Notes
To edit this field you require a security level of 1
Notes is an optional field. Use it as a reference for the users of this program. It will print on the same page as the main Equipment / Job Record. The field uses "word wrap" and will scroll if you have more to type than fits the screen. A MAXIMUM of 50 lines will be printed. If the Note extends beyond one page length, it will be printed in a second page. In this case, your printout will look better if you have a bottom and top margin set on your printer. See your printer manual for details. We recommend you limit yourself to 25 lines so printouts will fit on one page as long as the printer's "lines per page" is greater than 56.
File (Window) 3 Fields [Equipment/Job History]
While file 3 is active you may search/index on:
Tracker ID PM / CM
Maintenance Date Maintenance Person
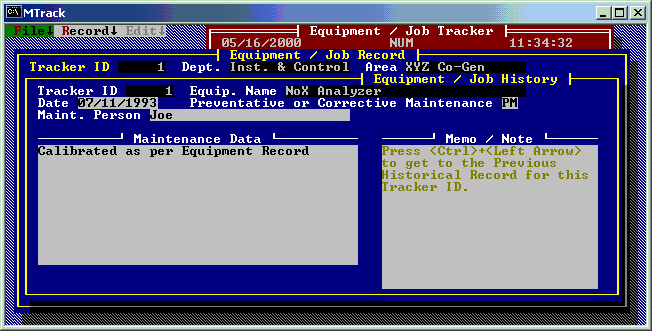
Field Name: Maintenance Date
To edit this field you require a security level of 1
Enter the date the maintenance was performed. Do this after updating the Equipment/Job Record IF this is for preventative maintenance, and the default date in the History Database will be correct. Otherwise you MUST enter the LAST PM date in the Equipment / Job Record after you finish entering data here in the History Database! Get in the habit of entering the LAST PM date FIRST if it's a PM you're documenting. If it is a CM, don't change the LAST PM date in the Equipment / Job Record UNLESS you want to count it as a PM .
Field Name: PM or CM
To edit this field you require a security level of 1
This field is designed to keep track of whether the maintenance was Preventative (PM) or Corrective (CM). This can be very useful in determining whether you're doing too much, not enough, or need to do something else!
Field Name: Maintenance Person
To edit this field you require a security level of 1
Enter the name of the lead person responsible for the work. This will let other users of this program know who to contact for more details.
Field Name: Maintenance Description (10 lines)
To edit this field you require a security level of 1
Maintenance Description is an optional field. You can include details here, or leave it blank. You can copy a previous record and simply change characters as necessary, so this can be a form for recording data.
Field Name: Memo / Note
To edit this field you require a security level of 1
Memo / Note is an optional field. Use it as a reference for the users of this program. Anything that is not conveniently entered in "Maintenance Description" can be entered here. This field uses word wrap and will scroll if you have more to type than fits the screen. A MAXIMUM of 40 lines will be printed. Use <Ctrl> <PageDown> to go to the next field.
Work Order Tracker (WODB)
General Information
Work Order Tracker Features
q Can be used to track an existing paperwork system
q Can be used as a complete Work Order system. Work Orders can even be submitted over a network.
q Provide easy methods to prioritize, search and find Work Orders.
q See the section titled "Reports" for information on printing filtered reports in either a list or full record format.
Please refer to the section titled "The MTrack Command Menu (Database Menus)" for a description of MTrack database terminology, searching for RECORDS, and selecting FILES (WINDOWS) or RECORDS.
Work Order Tracker contains only one WINDOW. All of the (search) Indexes are designed to put incomplete Work Orders at the TOP of the list. Completed Work Orders can be left in the database or deleted. You can also back up the Work Order Tracker data-files (WODB1.DBF & WODB1.DBT) THEN delete the completed Work Orders, saving the back-up files for reference. The MTrack Backup utility program will back up all your MTrack data files to a drive/directory you specify. If you need to use your backup files you can use the Restore utility which overwrites your current data files, or you can copy the backup files to a directory on your hard disk, use the "Set Data Path" option (Setup/Utility menu) to access the desired directory, then rebuild all the Indexes (Setup/Utility menu).
Reports are available under the "Print, Search & Sort" menu item (on the Main Menu). The most popular report is that for incomplete Work Orders, which can be selected from either the Full Record or List Format report filter. See the table of contents under "Reports" for details.
No Security level is required to ADD a Work Order and edit those fields consistent with submitting a Work Order. Security level 1 is required for editing the remainder of the fields (except Work Order number) or to EDIT AN EXISTING WORK ORDER. Level 2 is required to edit a Work Order number, or to set the default Work Order number for the next record added to the database.
The following list describes all the fields in each FILE (or WINDOW).
File (Window) 1 Fields [Work Order Database]
While file 1 is active you may search/index on:
Work Order number Completion Date /Priority
Department .. Area Completion Date /Dept
Area .. Sub-Area Completion Date /Area
Sub-Area ....
NOTE: Indexes having Completion Date as the first segment show incomplete Work Orders first, in order of the second segment (i.e. Area). The completed Work Orders follow, ordered by Completion Date.
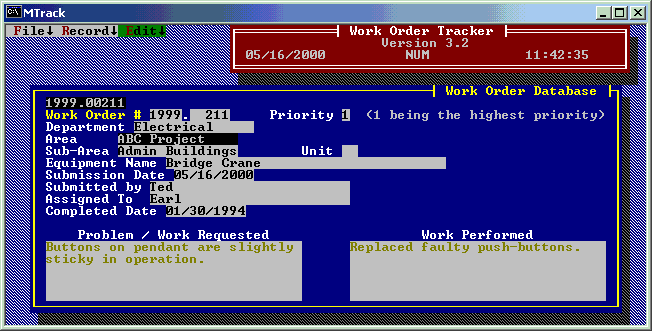
Field Name: Work Order Number - Year
To edit this field you require a security level of 2
Enter the year portion of the Work Order Number. The default is the current year. If your plant does not use work orders prefixed by the current year, we suggest you let the program use the year for the first half of the Work Order number.
Field Name: Work Order Number
To edit this field you require a security level of 2
Enter the Work Order Number. The default is incremented by one each time a record is added (or aborted). If your Security level is two (2) or greater, you may reset the default from the EDIT menu.
Field Name: Priority
To edit this field you require a security level of 0
Enter the Priority of the Work Order. 1 is the highest and 9 is the lowest Priority.
Field Name: Department
To edit this field you require a security level of 0
Enter the Department for the Work Order. This field uses a Look-Up in the Validation Database. Press <Enter> to choose from the Look-Up table.
Field Name: Sub Area
To edit this field you require a security level of 0
Enter the Sub-Area for the Work Order. This field uses a Look-Up in the Validation Database. Press <Enter> to choose from the Look-Up table. The Area field will automatically be filled in for you, based on your Sub-Area choice.
Field Name: Area
To edit this field you require a security level of 0
Enter the Area for the Work Order. This field uses a Look-Up in the Validation Database. The Area field will automatically be filled in for you, based on your Sub-Area choice.
Field Name: Unit Number
To edit this field you require a security level of 0
Enter the Unit # for the Work Order. If the work does not pertain to a particular Unit, enter zero (0).
Field Name: Equipment Name
To edit this field you require a security level of 0
Enter the name of the Equipment that requires the Work. Sometimes there is not a clear-cut name to use, so just enter something descriptive.
Field Name: Submission Date
To edit this field you require a security level of 1
Enter the date the Work Order was submitted. The default is today's date.
Field Name: Submitted By
To edit this field you require a security level of 0
Enter the name of the person who reported the problem or requested the work.
Field Name: Assigned To
To edit this field you require a security level of 1
Enter the name of the person who is primarily responsible for getting the work done.
Field Name: Completed Date
To edit this field you require a security level of 1
Enter the Date that the work was completed. If you don't need this record for future reference, we suggest you delete it.
Field Name: Problem / Work Requested
To edit this field you require a security level of 0
Enter the Problem, or the symptoms of the problem. Unless it is necessary or obvious, it is BEST TO DESCRIBE the PROBLEM--NOT what you think will fix it. Since this is a memo field, it will scroll to add more lines. Use <Ctrl> <PgDn> to go to the next field.
Field Name: Work Performed
To edit this field you require a security level of 1
Enter the work performed, if it is worthwhile saving this information. If you don't have any information here worth saving when the Work Order is completed, we suggest you delete it. Since this is a memo field, it will scroll to add more lines. Any necessary information can be appended to this field. Use <Ctrl> <PgDn> to go to the next field.
Tech Manual Tracker (MAN)
General Information
Tech Manual Tracker Features
q Manuals can be entered multiple times with different Descriptions/Models or Manufacturers. This can be done to facilitate searching, or because several manuals are kept together in one binder or folder with the same Manual Number.
q Provide easy methods to search and find Tech Manuals.
q See the section titled "Reports" for information on printing Index reports.
Please refer to the section titled "The MTrack Command Menu (Database Menus)" for a description of MTrack database terminology, searching for RECORDS, and selecting FILES (WINDOWS) or RECORDS.
Tech Manual Tracker contains two FILES (WINDOW). The first is the Tech Manual Database and the second is the Look-Up table for Tech Manual Prefixes. Each Tech Manual record contains three fields: Manual Number, Manufacturer, and Model/Description. The records are displayed in a TABLE format. The manual NUMBER may include a two character PREFIX using a Look-Up (window 2) and a one character suffix. Prefix and suffix use is optional, but (the PREFIX) is widely used to distinguish a plant or department to which the manual pertains. The actual manuals are kept in sequence (in a bookcase or file cabinet) so you can quickly find a manual once the Manual Number is known. To find a manual, users may browse through printed indexes, or search on-line with Tech Manual Tracker. Printed indexes and on-line searches are based on any of the three fields (Manual Number, Manufacturer, and Model/Description). You'll save many hours of frustration by organizing your technical manuals with Tech Manual Tracker!
Reports (printed indexes) are available under the "Print, Search & Sort" menu item (on the Main Menu). Reports can be sent to your printer, diskfile, or video screen for preview. See the table of contents under "Reports" for details.
Security level 1 is required for editing the Tech Manual Database. Security level 2 is required to ADD entries to the PREFIX Look-UP, and level 9 is required to change existing entries in the Look-Up.
The following list describes all the fields in each FILE (or WINDOW).
File (Window) 1 Fields [Tech Manual Database]
While file 1 is active you may search/index on: Manual Number, Manufacturer, or Description/Model.
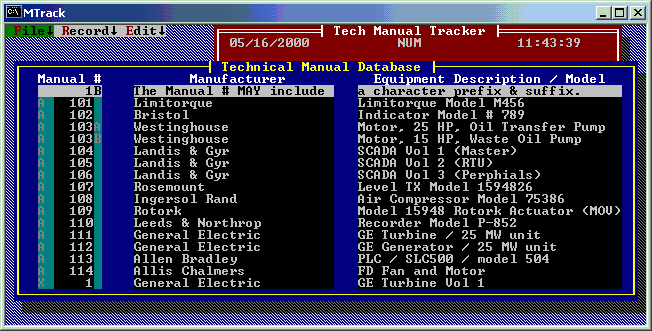
Field Name: Manual Number
To edit this field you require a security level of 1
The Manual Number is what you have for a label physically on your manual. It may include a two character PREFIX and a one character SUFFIX. The PREFIX must exist in the Look-Up Table (window 2). If a BLANK entry exists in the PREFIX Look-Up, the PREFIX may be left BLANK. Often a letter prefix is used to indicate the department, plant location, group, etc. that the manual pertains to. Your actual manuals should be organized by normal alphanumeric methods. By searching within Tech Manual Tracker, or browsing an indexed printout, you will be able to find the number of the manual that holds information for a specific Manufacturer or Equipment Description.
Field Name: Manufacturer Name
To edit this field you require a security level of 1
Enter the manufacturer's name for the item the manual covers. This is the most common field used to search and index on for this database.
Field Name: Equipment Description / Model
To edit this field you require a security level of 1
Enter a model or description of the item that the manual covers. Typically, you would search on Manufacturer (or use a printed index based on Manufacturer), after locating the desired manufacturer, find the Description / Model that matches what you are looking for, then just note the manual number and go pick it out! Of course, you may search and index the records based on Equipment Description / Model also.
File (Window) 2 Fields [Prefix Look-Up]
While file 2 is active you may search/index on: Prefix (Tech Manual)
Field Name: Prefix (Look-Up)
To ADD entries you require a security level of 2 To CHANGE entries you require a security level of 9
Enter the Prefixes that you want users to be able to enter in the Manual Number (Prefix) field. If you're not going to use prefixes, simply include a "Blank" entry. Typically a prefix is used to indicate an area, plant, or department that the manual pertains to. This can be helpfull when indexing the records by manual number, since the manuals will be ordered first by this prefix. As with all Look-Up tables, if you change an entry, search for all records using the OLD entry and replace with the NEW entry! Thats why security level 9 is required to change a Look-Up!
Field Name: Prefix Description
To ADD entries you require a security level of 2 To CHANGE entries you require a security level of 9
This field is provided as a reference to users indicating the description of the Prefix.
Parts Tracker (PARTS)
General Information
Parts Tracker Features
q Can be used for shop inventory or in a parts warehouse.
q Provide easy methods to search and find parts.
q See the section titled "Reports" for information on printing filtered reports. Individual records, records that are low in stock, or records that are low in stock and not on order can be selected.
Please refer to the section titled "The MTrack Command Menu (Database Menus)" for a description of MTrack database terminology, searching for RECORDS, and selecting FILES (WINDOWS) or RECORDS.
Parts Tracker contains two FILES (WINDOWS). The first FILE (WINDOW) is called the Main Record, which can be printed quickly by pressing <Alt>+<P>. It stores all the information for each part. The second FILE (WINDOW) displays the CATEGORY Look-Up Table. The purpose of a Look-Up for the "Category" field is to make it easier to find a part when you don't know manufacturer, vendor, part number, etc. By limiting the available choices for the "Category" field, you can easily search the most likely categories for the part. Obviously it makes sense to choose your categories carefully. At the bottom of the Main Record is a box that is used to add to or subtract from the "Quantity in Stock" field. When adding to stock, you may elect to reduce the "Quantity on Order" field by the amount added.
Reports are available under the "Print, Search & Sort" menu item (on the Main Menu). See the table of contents under "Reports" for details.
No security level is required to add to or subtract from the "Quantity in Stock". Security level 1 is required for editing the rest of the fields, except for "Part ID number". Level 2 is required to edit a Part ID number, to set the default Part ID number for the next record added to the database, and to ADD an entry to the CATEGORY Look-Up table. Security level 9 is required to CHANGE an entry in any Look-Up table.
The following list describes all the fields in each FILE (or WINDOW).
File (Window) 1 Fields [Parts Database]
While file 1 is active you may search/index on:
Part ID number Category
Mfg of Part Part # 1
Mfg of Equip Part # 2
Vendor
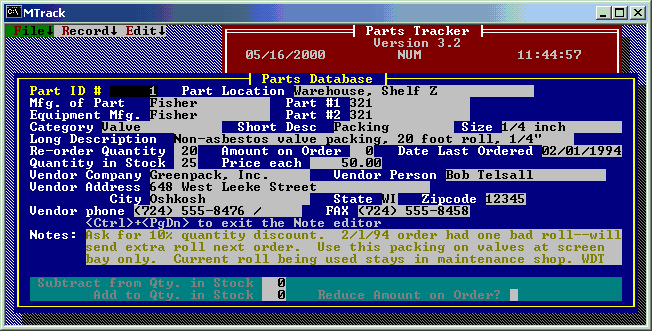
Field Name: Parts to subtract from
stock
Use this field to SUBTRACT from the Quantity in Stock. This field may be edited by any User--a security level is not required.
Field Name: Parts to add to stock
Use this field to ADD to the Quantity in Stock. This field may be edited by any user--a security level is not required.
Field Name: Reduce Amount on Order Y/N
A Y (Yes) in this field will cause the Amount on order field to be reduced by the Amount added to stock. It is only available if parts are being added to stock. This field may be edited by any user--a security level is not required.
Field Name: Part ID #
To edit this field you require a security level of 2
This field must be a unique number. Accept the default unless you have a very good reason not to! A warning will appear if a duplicate PART ID exists when saving the record. A security level of at least 2 is required to change this number. The default is one number greater than the last record added (or aborted). The default may be set from the EDIT menu (if your security level is at least 2). The default should be set greater than the largest Part ID number currently in the database.
Field Name: Part Location
To edit this field you require a security level of 1
Enter the location where the part may be found (such as Aisle 4, Section, 3, Bin 13).
Field Name: Part Manufacturer
To edit this field you require a security level of 1
Enter the name of the manufacturer of the part.
Field Name: Part Number 1
To edit this field you require a security level of 1
Enter a part number. Part # 1 is required, Part # 2 is optional. Part # 1 should usually be the part number used by the manufacturer.
Field Name: Manufacturer of Equipment
To edit this field you require a security level of 1
Enter the name of the manufacturer of the equipment that the part is used for.
Field Name: Part Number 2
To edit this field you require a security level of 1
Enter a part number. Part # 1 is required, Part # 2 is optional. Part # 2 should usually be the part number given by the equipment manufacturer or vendor.
Field Name: Category
To edit this field you require a security level of 1
Enter a Category Name. This field is used to find a part when you don't have a part number or a Manufacturer. This entry must exist in the PARTS CATEGORY Database. Hit <enter> for a list.
Field Name: Short Description
To edit this field you require a security level of 1
Enter a short description of the part. This is the description that will be seen when searching the database.
Field Name: Size
To edit this field you require a security level of 1
Enter a size parameter for the part, if applicable. This field is used in several of the Search Lists, so it is a good idea to include data here.
Field Name: Long Description
To edit this field you require a security level of 1
Enter a long description of the part.
Field Name: Re-Order Quantity
To edit this field you require a security level of 1
Enter a quantity greater than or equal to zero. When the quantity in stock reaches this amount, re-ordering is necessary. The report filter for Parts Tracker uses this field to determine which parts are low in stock.
Field Name: Amount on Order
To edit this field you require a security level of 1
Enter the number of parts on order. The entry in this field is used in filtering the report for Low quantity and Not on order. When the order is filled, ZERO this field (or reduce it by the amount of parts received). This can be done conveniently by entering the amount of parts received in the "Add to Qty. in Stock" field and entering a "Y" in the "Reduce Amount on Order" field.
Field Name: Order Date
To edit this field you require a security level of 1
Enter the date the part or parts were last ordered. This is for your reference when analyzing your inventory. Change the date when you order parts. Don't forget to change the "Amount on Order" field also.
Field Name: Quantity in Stock
To edit this field you require a security level of 1
Enter a quantity greater than or equal to zero. Use the Add / Subtract from Quantity in Stock field once the initial value has been entered.
Field Name: Price Each
To edit this field you require a security level of 1
Enter a price greater than or equal to zero.
Field Name: Vendor Company
To edit this field you require a security level of 1
Enter the name of the vendor company for the part.
Field Name: Vendor Person
To edit this field you require a security level of 1
Enter the name of the contact person at the vendor company.
Field Name: Vendor Address
To edit this field you require a security level of 1
Enter the street address of the vendor company.
Field Name: Vendor City
To edit this field you require a security level of 1
Enter the city portion of the vendor company address.
Field Name: Vendor State
To edit this field you require a security level of 1
Enter the state portion of the vendor company address.
Field Name: Vendor Zip Code
To edit this field you require a security level of 1
Enter the zip code portion of the vendor company address.
Field Name: Vendor Phone #
To edit this field you require a security level of 1
Enter the phone number for the vendor.
Field Name: Vendor FAX #
To edit this field you require a security level of 1
Enter the FAX number for the vendor.
Field Name: Note
To edit this field you require a security level of 1
Enter any information that may be helpful, but is not included in the other fields. This field uses word wrap and will scroll if you have more to type than fits the screen. To EXIT the Note Field and edit other fields press <Ctrl>+<PgDn>. To save the record press <F10>.
File (Window) 2 Fields [Categories]
While file 2 is active you may search/index on: Category
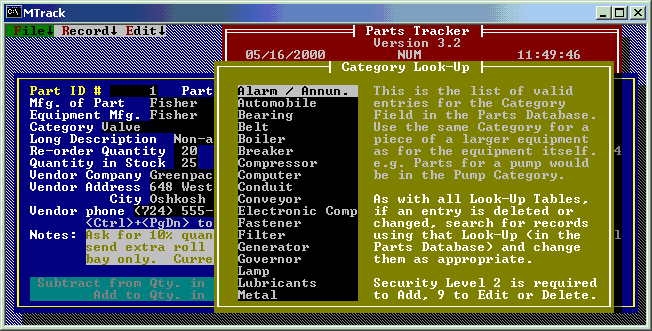
Field Name: Category (Look-Up Table)
To ADD entries you require security level of 2. To CHANGE entries you require security level 9.
Enter a category name. This field is used to find a part when you don't have a part number or a manufacturer. This is a Look-Up table for the Main Parts Database. Its purpose is to restrict the "Category" Field to a list of valid entries. By carefully avoiding similar categories and spelling differences, finding a part when you don't know the manufacturer, vendor, or a part number is relatively easy. If you CHANGE an entry, change the all parts records accordingly.
Drawing Tracker (DWG)
General Information
Drawing Tracker Features
q Provide easy methods to search and find Drawings.
q Keyword field uses a built in Look-Up. Enables Indexing on Keyword so that related drawings are grouped.
q See the section titled "Reports" for information on printing Index reports.
Please refer to the section titled "The MTrack Command Menu (Database Menus)" for a description of MTrack database terminology, searching for RECORDS, and selecting FILES (WINDOWS) or RECORDS.
Drawing Tracker contains two FILES (WINDOWS). The first is the Drawing Database and the second is the Look-Up Table for Drawing KEYWORDs. Each drawing record contains four fields: Drawing Number, Sub-Area, Keyword, and Description. The records are displayed in a TABLE format. The Drawing Number field may contain characters other than numbers.
Reports are available under the "Print, Search & Sort" menu item (on the Main Menu). See the table of contents under "Reports" for details.
Security level 1 is required for editing the Drawing Database. Security level 2 is required to ADD entries to the KEYWORD Look-Up, and level 9 is required to CHANGE existing entries in the Look-Up.
The following list describes all the fields in each FILE (or WINDOW).
File (Window) 1 Fields
While file 1 is active you may search/index on: Drawing Number, Sub-Area, Keyword, or Description
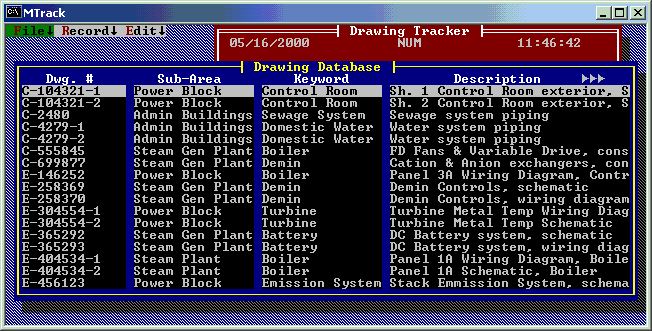
Field Name: Drawing Number
To edit this field you require a security level of 1
Enter the number (and letters) that identify the drawing.
Field Name: Sub-Area
To edit this field you require a security level of 1
Enter the Sub-Area that is associated with the drawing. This field uses a Look-Up to the Validation Database. Press <F2> for a list of Sub-Areas to choose from.
Field Name: Keyword
To edit this field you require a security level of 1
Enter a Keyword that is associated with the drawing. This field uses a Look-Up to the Keyword Table in Window 2. Press <F2> for a list of available choices.
Field Name: Description
To edit this field you require a security level of 1
Enter up to a 75 character description for the drawing. The first 31 characters are visible in the table view presented in Window 1. While editing, the field scrolls left & right. When a list window is displayed during a Search/Index operation, all 75 characters can be viewed. Printed reports show all 75 characters.
File (Window) 2 Fields
While file 2 is active you may search/index on: Keyword (Drawing)
Field Name: Keyword (Look-Up Table)
To ADD entries you require a security level of 2 To CHANGE entries you require a security level of 9
Enter the Prefixes that you want users to be able to enter in the KEYWORD field. A Keyword typically helps to group drawings. As with all Look-Up tables, if you change an entry, search for all records using the OLD entry and replace with the NEW entry! (This is why security level 9 is required to change a Look-Up!)
Validation Database (VALDB)
General Information
Validation Database Features
q These Look-Up tables provide the only allowable entries for their respective fields in Equipment/Job Tracker, Work Order Tracker, Tech Manual Tracker, Parts Tracker, and Drawing Tracker. Pressing <F2> in a field with a Look-Up will display a list window to pick from.
q By incorporating a Look-Up, consistent entry of data is achieved, allowing reliable searching and report filtering of the databases.
q See the section titled "Reports" for information on printing the Look-Up Tables.
Please refer to the section titled "The MTrack Command Menu (Database Menus)" for a description of MTrack database terminology, searching for RECORDS, and selecting FILES (WINDOWS) or RECORDS.
The Validation Database contains nine FILES (WINDOWS). These are the most critical data-files in MTrack since other modules depend on them. When adding new a Look-Up entry, make sure it's exactly what you want before pressing <F10> to save it. (Look-Up tables are not case sensitive, by the way.) If you have to modify an existing Look-Up entry, you MUST search and find all the records in Equipment/Job Tracker, Work Order Tracker, Tech Manual Tracker, Parts Tracker, and Drawing Tracker that used the old entry, and replace with the new Look-Up entry. This is necessary to insure reliable searches and report filtering.
NOTE: Some Look-Up tables may require that the first few characters be unique. In these cases, a duplicate key warning message will result and the entry will not be saved.
Reports are available under the "Print, Search & Sort" menu item (on the Main Menu). See the table of contents under "Reports" for details.
Security level 2 is required to add a new entry to a Look-Up table in the Validation Database. Security level 9 is required to change an existing entry in a Look-Up table.
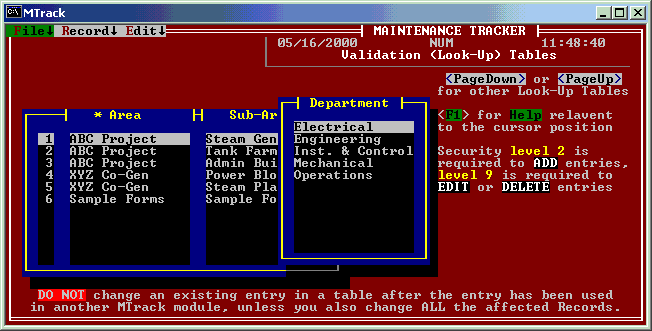
The following list describes all the fields in each FILE (or WINDOW).
File (Window) 1 Fields [Area]
While file 1 is active you may search/index on: Area
Field Name: AREA
To edit this field you require a security level of 2 (Level 9 required to delete or change an existing entry.)
AREA should represent a physically separate place--for example, "River 1 Hydro Electric Plants" and "River 2 Hydro Electric Plants." If you foresee only SUB-AREAs for your application, enter your company name for every entry in the AREA field. We have provided the AREA and SUB-AREA fields to be compatible with large, physically separate operations that must segregate their records based on their diverse locations. The entries in this Look-Up table are used only in the following Area/Sub-Area table.
File (Window) 2 Fields [Area/Sub-Area]
While file 2 is active you may search/index on: Location number, Area, or Sub-Area
Field Name: Area
To edit this field you require a security level of 2 (Level 9 required to delete or change an existing entry.)
This field uses a Look-Up to the previous AREA Look-Up table. You may press <F2> for a list of Areas to choose from.
Field Name: Sub Area
To edit this field you require a security level of 2 (Level 9 required to delete or change an existing entry.)
SUB-AREA should represent a physically separate place also, such as "Generating Plant," "Coal Yard," or "Switch Yard." Keep in mind that a SUB-AREA is part of an AREA. You should always have more SUB-AREAs than AREAs. Take your time to get this physical structure of your Company right the first time. Note: Each SUB-AREA must be unique, no duplicates are allowed. If you have SUB-AREAs (in different AREAs) that you want named similarly, add a different prefix of some sort to each SUB-AREA. For example; you have two AREAs, "Plant 1" and "Plant 2". Each has a SUB-AREA called "BagHouse". Name one "1 BagHouse" and the other "2 BagHouse".
Field Name: Location Number
To edit this field you require a security level of 2 (Level 9 required to delete or change an existing entry.)
Location # is used internally by the program. Try to enter your AREAs and SUB-AREAs so they are in a convenient order. The Location # can be changed as desired without affecting any other MTrack modules. The default for this field is incremented by one each time a record is added (or aborted). This default may be reset from the EDIT menu (with security level greater than or equal to 2).
File (Window) 3 Fields [Departments]
While file 2 is active you may search/index on: Department
Field Name: Department
To edit this field you require a security level of 2 (Level 9 required to delete or change an existing entry.)
Enter all the possible work groups that may be entered in the Database. Don't forget departments such as Operations and Engineering that may use the database to schedule or document some (or all) of their work, as well as the usual Electrical, Mechanical and Instrument Shops, etc.
File (Window) 4 Fields [Plant Systems]
While file 3 is active you may search/index on: System
Field Name: System
To edit this field you require a security level of 2 (Level 9 required to delete or change an existing entry.)
System is a LOGICAL way to sort the equipment (or a job pertaining to such). This is contrasted with the PHYSICAL sorting of AREAs & SUB-AREAs. For example, "Tank Farm" is PHYSICALLY separate from "Generating Plant," but the "Service Air" SYSTEM goes to them both. The "Service Air" SYSTEM is separate from the "Fire Protection" SYSTEM in a LOGICAL sense even though both PHYSICALLY exist in the "Tank Farm" & "Generating Plant". "N/A" or something similar MUST always be an entry in this table for non-System records. Tip: Use a SPACE as the first character so it will be first in this table.
File (Window) 4 Fields [Equipment Types]
While file 4 is active you may search/index on: Equip Type
Field Name: Equipment Type
To edit this field you require a security level of 2 (Level 9 required to delete or change an existing entry.)
Equipment Types are best left fairly generic; e.g., Pump, Fan, Compressor, Pressure TX, Pressure Switch, Motor Operated Valve, etc. Indexes based on equipment type are most valuable when searching for similar equipment. This is useful for copying an existing record when adding a new one, and comparing maintenance for similar equipment. One entry should be " N/A" so users can enter this when Equip. Type does not apply. Leave a SPACE in front so it's FIRST in the list. "Other" is should also be an entry in this table.
File (Window) 6 Fields [Equipment/Job Groups]
While file 5 is active you may search/index on: Group
Field Name: Group
To edit this field you require a security level of 2 (Level 9 required to delete or change an existing entry.)
Maintenance Groups will keep records tied to each other that have the same Group Name in one of the three Group Fields in the Equipment / Job Record. This is a very useful and under-used feature. If you have work that is more efficiently done together, create a Group for those records to belong to. Even more useful is EVENT-driven Maintenance! TIME-driven maintenance is what your PM Due Date is for; EVENT-driven works with Groups. For example, every time the plant is down certain pieces of equipment require checking, calibration, overhaul or whatever. No one knows for sure when the plant is going down, so this is EVENT-driven. There MUST be an entry similar to "N/A" in this field. Preface this entry with a SPACE so it is FIRST in the list!
File (Window) 7 Fields [Part Categories]
While file 6 is active you may search/index on: Category
Field Name: Category
To edit this field you require a security level of 2 (Level 9 required to delete or change an existing entry.)
This table is used in the Parts Tracker database. The purpose for the category field Look-Up is to allow the user to search a finite number of probable part categories when a manufacturer, part number, vendor name, etc. are not known. This Look-Up may also be edited from within Parts Tracker.
File (Window) 8 Fields [Tech Manual Prefix]
While file 8 is active you may search/index on: Prefix
Field Name: Prefix
To edit this field you require a security level of 2 (Level 9 required to delete or change an existing entry.)
This table is used in the Tech Manual database, and can be edited from within Tech Manual Tracker. Enter the Prefixes that you want users to be able to enter in the Manual Number (Prefix) field. If you're not going to use prefixes, simply include a "Blank" entry. Typically a prefix is used to indicate an area, plant, or department that the manual pertains to. This can be helpfull when indexing the records by manual number, since the manuals will be ordered first by this prefix.
File (Window) 9 Fields [Drawing Keyword]
While file 9 is active you may search/index on: Keyword
Field Name: Keyword
To edit this field you require a security level of 2 (Level 9 required to delete or change an existing entry.)
This table is used in the Drawing Tracker database, and can be edited from within Drawing Tracker. Enter the Keywords that you want users to be able to enter in the KEYWORD field. A Keyword typically helps to group drawings.
Reports
All reports are accessed from the MTrack Main Menu item "Print, Search & Sort". Follow the menus and select the report you wish to make. All Report Filters work in a similar fashion. In each field you can enter filtering criteria that every record to be included in the report must meet. You can press <F2> for a list of valid entries for the particular field the cursor is in. If you enter invalid filter criteria, either a list of valid entries will be displayed for you to pick from, or a descriptive error message is displayed. You can also press <F1> for on-line help with a field.
Reports can be sent to a hardware device such as your printer port, or sent to the video monitor for a preview. You may also send the report to a disk-file which can be viewed and edited in MTEdit, or any word processor. If you wish to print more than one copy of the report, enter the number of copies to print in the appropriate field. You must also set the LINES PER PAGE in the report filter, which must match the PRINTER'S LINES PER PAGE setting. If these settings don't match, pages in the report will not start at the top of each page. Graphic line draw characters can be suppressed by entering a N in the appropriate report filter field. Please see the section titled "Printer Setup" for further information.
The following lists the available reports.
Available Reports
ü Equipment/Job Record searches & sorts (in either list or full record format) [equipment/job tracker]
Select records based on any combination of Area, Sub-Area, Department, PM due date, or a single Tracker ID.
Select sorting by Department, Area, or Tracker ID number.
ü Equipment/Job Record searches by Group (in either list or full record format) [equipment/job tracker]
Select records based on any combination of Maintenance Group, Department, Area, or Sub-Area.
Select sorting by Department, Area, or Tracker ID number.
ü Equipment/Job History [equipment/job tracker]
Select History records for a given Equipment (Tracker ID), and a date range for the History records to include.
ü Work Orders (in either list or full record format) [work order tracker]
Select records based on any combination of Work Order number, range of numbers, Department, Area, or completion status.
ü Tech Manual Indexes [tech manual tracker]
Select an index to print based on Manufacturer, Description/Model, or Manual number.
ü Parts Records [parts tracker]
Select a single record based on Part ID number.
Select all records whose quantity in stock is less than or equal to their re-order quantity.
Select all records whose quantity in stock is less than or equal to their re-order quantity, and zero is the quantity on order.
ü Drawing Indexes [drawing tracker]
Select an index to print based on Drawing number, Sub-Area, or Keyword.
Select Drawings for a specific Sub-Area.
ü Look-Up Tables [validation database]
Select which (or all) Look-Up Tables from the Validation Database to include in the report.
Equipment/Job Report Filter
Equipment/Job Record Searches & Sorts
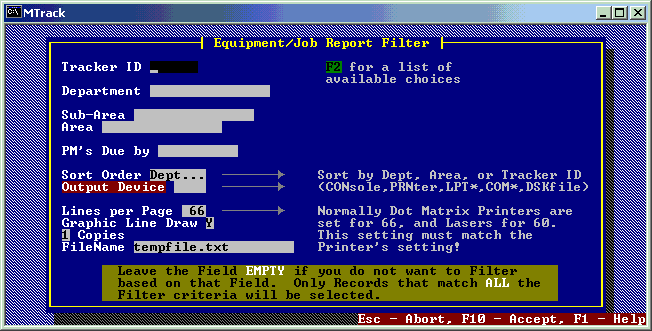
Field Name: Tracker ID
Entering a Tracker ID will result in just that record being selected. A List Box will appear if you don't enter a valid ID number. Press <F2> to get a complete list of available choices. (This is standard throughout MTrack.)
Field Name: Department
Enter a Department Name to limit the sort to a Department. A List Box will appear if you don't enter a valid name.
Field Name: Sub Area
Enter a Sub-Area to limit the sort to a specific Sub-Area. A List Box will appear if you don't enter a valid name.
Field Name: Area
Enter an Area to limit the sort to a specific Area. A List Box will appear if you don't enter a valid name.
Field Name: Due By (PM due date)
Enter a Date to limit the sort to only PM's DUE prior to the entered Date. If you are filtering on PM due date, usually you should set this date ahead of the current date. This will not only allow you to select records that are past due, but those that are coming due.
Field Name: Sort Order
This determines the order in which the records will be sorted. Sorts are available by Dept. (with Area, Sub-Area, Unit, and Name following in alpha numeric order), by Area (with Sub-Area, Dept., Unit, and Name following in alpha numeric order), or by Tracker ID number.
Field Name: Output Device
Selects the Output device for the Report. CONsole is your video monitor, PRNter is your default printer, LPT1 & LPT2 are parallel ports, COM1-4 are serial ports, and DSKfile is a text file on your hard disk. A DiSKfile is useful for browsing through the report with the Text File Editor (Utilities Sub Menu) or editing in any text editor or word processor.
Field Name: Lines per Page
This setting MUST match the printer that the report will be printed on. Some printers use a Lines per Inch (LPI) and a top and bottom margin setting. The following example shows how to calculate Lines per Page: The printer is set for 6 LPI with 1/4" top AND bottom margins. The paper is 11" long. The Lines per Page = (11-1/4-1/4) times 6, which is 63.
Field Name: Graphic Line Draw
Setting this to N (No) allows compatibility with printers that have the wrong CHARACTER SET selected as default. If you get weird characters where a line should be, either set this to N, or change your printer's default CHARACTER SET to a LINE DRAW or GRAPHIC CHARACTER set. See your printer manual for details
Field Name: Copies
Enter the number of copies to make of this report.
Field Name: FileName
If the report is sent to a DiSKfile, enter the FileName here.
Equipment/Job Group Report Filter
Equipment/Job Searches by Group

Field Name: Department
Entering a Department restricts the sort to records with that Department. A list box will appear if invalid data is entered. Press <F2> to get a complete list of available choices. (This is standard throughout MTrack.)
Field Name: Sub Area
Entering a Sub-Area restricts the sort to records in that Sub-Area. A list box will appear if invalid data is entered.
Field Name: Area
Entering an Area restricts the sort to records in that Area. A list box will appear if invalid data is entered.
Field Name: Group (Equipment/Job Group)
Selects a Group to filter from. Only records belonging to the Group will be selected. Records can belong to up to three Groups.
Field Name: Sort Order
Determines the ordering of the records: by Dept... (followed by Area, Sub-Area, Unit and Name in alpha numeric order), by Area... (followed by Sub-Area, Dept., Unit and Name in alpha numeric order), or by Tracker ID number.
Field Name: Output Device
Selects the Output device for the Report. CONsole is your video monitor, PRNter is your default printer, LPT1 & LPT2 are parallel ports, COM1-4 are serial ports, and DSKfile is a text file on your hard disk. A DiSKfile is useful for browsing the report with the Text File Editor (Utilities Sub Menu) or editing in any text editor or word processor.
Field Name: Lines per Page
This setting MUST match the printer that the report will be printed on. Some printers use a Lines per Inch (LPI) and a top and bottom margin setting. The following example shows how to calculate Lines per Page: The printer is set for 6 LPI with 1/4" top AND bottom margins. The paper is 11" long. Lines per Page = (11-1/4-1/4) times 6, which is 63.
Field Name: Graphic Line Draw
Setting this to N (No) will allow compatibility with printers that have the wrong CHARACTER SET selected as default. If you get weird characters where a line should be, either set this to N, or change your printer's default CHARACTER SET to a LINE DRAW or GRAPHIC CHARACTER set. See your printer manual for details.
Field Name: Copies
Enter the number of copies to make of this report.
Field Name: FileName
If the report is sent to a DiSKfile, enter the FileName here.
Equipment/Job History Report Filter
Equipment/Job History
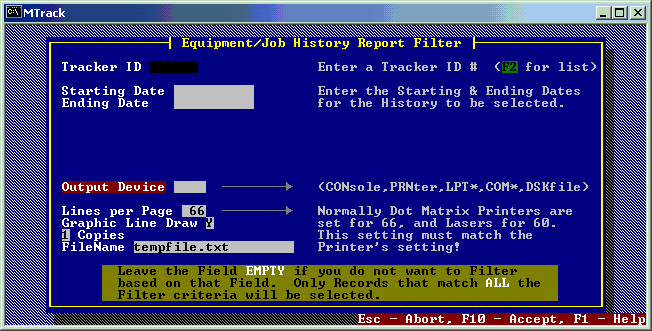
Field Name: Tracker ID
Enter the Tracker ID number of the Equipment/Job for which you want a History report. Press <F2> to get a complete list of available choices. (This is standard throughout MTrack.)
Field Name: Start Date
Enter the Start Date for the Report. If none is entered, the start will be the earliest record.
Field Name: End Date
Enter the Ending Date for the Report. If none is entered, the end will be the latest record.
Field Name: Output Device
Select the Output device for the Report. CONsole is your video monitor, PRNter is your default printer, LPT1 & LPT2 are parallel ports, COM1-4 are serial ports, and DSKfile is a text file on your hard disk. A DiSKfile is useful for browsing through the report with the Text File Editor (Utilities Sub Menu) or editing in any text editor or word processor.
Field Name: Lines per Page
This setting MUST match the printer that the report will be printed on. Some printers use a Lines per Inch (LPI) and a top and bottom margin setting. The following example shows how to calculate Lines per Page: The printer is set for 6 LPI with 1/4" top AND bottom margins. The paper is 11" long. Lines per Page = (11-1/4-1/4) times 6, which is 63.
Field Name: Graphic Line Draw
Setting this to N (No) will allow compatibility with printers that have the wrong CHARACTER SET selected as default. If you get weird characters where a line should be, either set this to N, or change your printer's default CHARACTER SET to a LINE DRAW or GRAPHIC CHARACTER set. See your printer manual for details.
Field Name: Copies
Enter the number of copies to make of this report.
Field Name: FileName
If the report is sent to a DiSKfile, enter the FileName here.
Work Order Report Filter
Work Orders
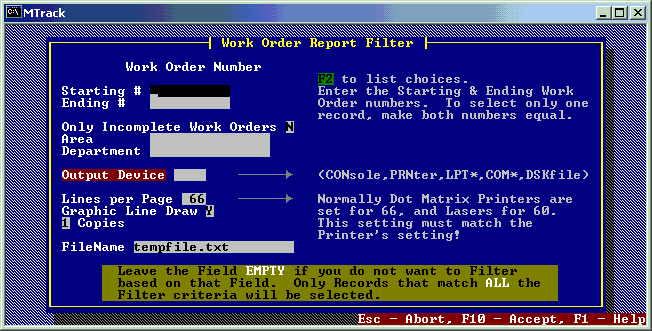
Field Name: Starting Work Order Number
Enter the Work Order # for the first record to print (report). Press <F2> to get a complete list of available choices. (This is standard throughout MTrack.) Leave empty to include records starting with the lowest Work Order number.
Field Name: Ending Work Order Number
Enter the Work Order # number for the last record to print (report). Enter the same number as the starting Work Order number to select a single Work Order. Leave empty to include up to the highest Work Order number.
Field Name: Incomplete (Y/N)
Entering Y (Yes) will restrict the report to only those Work Orders that have not been completed. (The completion date field in the Work Order is empty.)
Field Name: Area
Enter a Area name to restrict the report to Work Orders in the specified Area. (Press <F2> for a list of choices)
Field Name: Department
Enter a department name to restrict the report to Work Orders in the specified department. (Press <F2> for a list of choices)
Field Name: Output Device
Select the Output device for the Report. CONsole is your video monitor, PRNter is your default printer, LPT1 & LPT2 are parallel ports, COM1-4 are serial ports, and DSKfile is a text file on your hard disk. A DiSKfile is useful for browsing through the report with the Text File Editor (Utilities Sub Menu) or editing in any text editor or word processor.
Field Name: Lines per Page
This setting MUST match the printer that the report will be printed on. Some printers use a Lines per Inch (LPI) and a top and bottom margin setting. The following example shows how to calculate Lines per Page: The printer is set for 6 LPI with 1/4" top AND bottom margins. The paper is 11" long. Lines per Page = (11-1/4-1/4) times 6, which is 63.
Field Name: Graphic Line Draw
Setting this to N (No) will allow compatibility with printers that have the wrong CHARACTER SET selected as default. If you get weird characters where a line should be, either set this to N, or change your printer's default CHARACTER SET to a LINE DRAW or GRAPHIC CHARACTER set. See your printer manual for details.
Field Name: Copies
Enter the number of copies to make of this report.
Field Name: FileName
If the report is sent to a DiSKfile, enter the FileName here.
Technical Manual Report Filter
Tech Manual Indexes
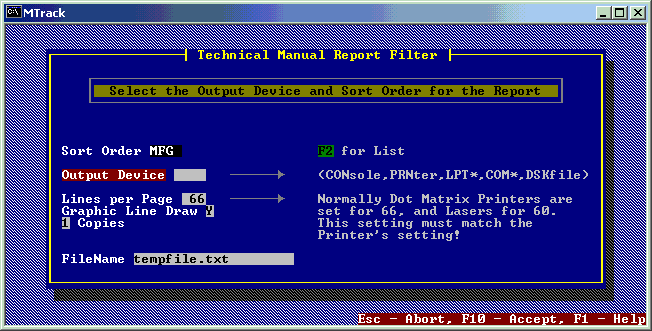
Field Name: Sort Order
Select either a sort based on Manual Number, Manufacturer, or Description/Model. Press <F2> to get a complete list of available choices. (This is standard throughout MTrack.)
Field Name: Output Device
Select the Output device for the Report. CONsole is your video monitor, PRNter is your default printer, LPT1 & LPT2 are parallel ports, COM1-4 are serial ports, and DSKfile is a text file on your hard disk. A DiSKfile is useful for browsing through the report with the Text File Editor (Utilities Sub Menu) or editing in any text editor or word processor.
Field Name: Lines per Page
This setting MUST match the printer that the report will be printed on. Some printers use a Lines per Inch (LPI) and a top and bottom margin setting. The following example shows how to calculate Lines per Page: The printer is set for 6 LPI with 1/4" top AND bottom margins. The paper is 11" long. Lines per Page = (11-1/4-1/4) times 6, which is 63.
Field Name: Graphic Line Draw
Setting this to N (No) will allow compatibility with printers that have the wrong CHARACTER SET selected as default. If you get weird characters where a line should be, either set this to N, or change your printer's default CHARACTER SET to a LINE DRAW or GRAPHIC CHARACTER set. See your printer manual for details.
Field Name: Copies
Enter the number of copies to make of this report.
Field Name: FileName
If the report is sent to a DiSKfile, enter the FileName here.
Parts Tracker Report Filter
Parts Records
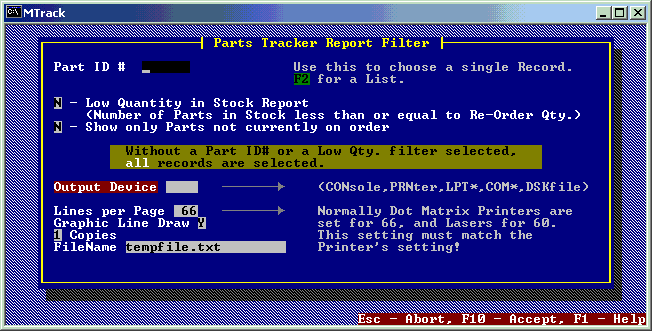
Field Name: Part ID #
Entering a Part ID # will result in just that Record being selected. A list box will appear if you don't enter a valid ID number. Press <F2> to get a complete list of available choices. (This is standard throughout MTrack.)
Field Name: Quantity Low
Enter a Y (Yes) to select parts that are low in quantity. Low is defined as Quantity in stock less than or equal to the Re-order Quantity.
Field Name: Not on Order
Enter a Y (Yes) to select parts that are low in quantity AND not on order (that is, zero is the Amount on Order). Low is defined as Quantity in stock less than or equal to the Re-order Quantity.
Field Name: Output Device
Select the output device for the report. CONsole is your video monitor, PRNter is your default printer, LPT1 & LPT2 are parallel ports, COM1-4 are serial ports, and DSKfile is a text file on your hard disk. A DiSKfile is useful for browsing through the report with the Text File Editor (Utilities Sub Menu) or editing in any text editor or word processor.
Field Name: Lines per Page
This setting MUST match the printer that the report will be printed on. Some printers use a Lines per Inch (LPI) and a top and bottom margin setting. The following example shows how to calculate Lines per Page: The printer is set for 6 LPI with 1/4" top AND bottom margins. The paper is 11" long. Lines per Page = (11-1/4-1/4) times 6, which is 63.
Field Name: Graphic Line Draw
Setting this to N (No) will allow compatibility with printers that have the wrong CHARACTER SET selected as default. If you get weird characters where a line should be, either set this to N, or change your printer's default CHARACTER SET to a LINE DRAW or GRAPHIC CHARACTER set. See your printer manual for details.
Field Name: Copies
Enter the number of copies to make of this report.
Field Name: FileName
If the report is sent to a DiSKfile, enter the FileName here.
Drawing Tracker Report Filter
Drawing Indexes
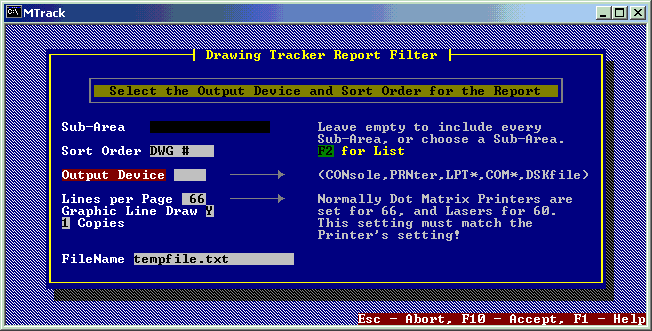
Field Name: Sub-Area
Leave empty to include all Sub-Areas in the report. Enter a Sub-Area to restrict the report to a specific Sub-Area. Press <F2> for a list to choose from.
Field Name: Sort Order
Select either a sort based on Drawing Number, Sub-Area, or Keyword. Press <F2> to get a complete list of available choices. (This is standard throughout MTrack.)
Field Name: Output Device
Select the output device for the report. CONsole is your video monitor, PRNter is your default printer, LPT1 & LPT2 are parallel ports, COM1-4 are serial ports, and DSKfile is a text file on your hard disk. A DiSKfile is useful for browsing through the report with the Text File Editor (Utilities Sub Menu) or editing in any text editor or word processor.
Field Name: Lines per Page
This setting MUST match the printer that the report will be printed on. Some printers use a Lines per Inch (LPI) and a top and bottom margin setting. The following example shows how to calculate Lines per Page: The printer is set for 6 LPI with 1/4" top AND bottom margins. The paper is 11" long. Lines per Page = (11-1/4-1/4) times 6, which is 63.
Field Name: Graphic Line Draw
Setting this to N (No) will allow compatibility with printers that have the wrong CHARACTER SET selected as default. If you get weird characters where a line should be, either set this to N, or change your printer's default CHARACTER SET to a LINE DRAW or GRAPHIC CHARACTER set. See your printer manual for details.
Field Name: Copies
Enter the number of copies to make of this report.
Field Name: FileName
If the report is sent to a DiSKfile, enter the FileName here.
Look-Up Table Report Filter
Look-Up Tables
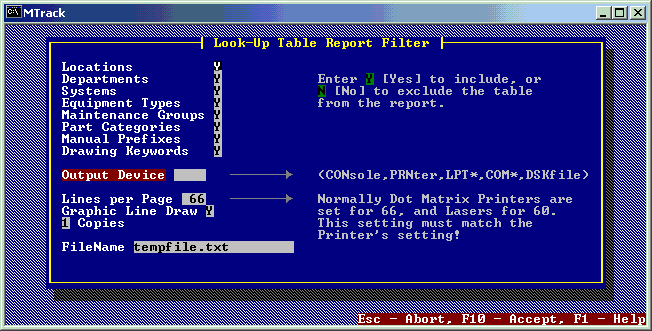
Select the Tables to include in report
Location (Areas & Sub-Areas), Department, System, Equipment Type, Maintenance Group, Part Category, Tech Manual Prefix, or Drawing Keyword. Enter a Y [Yes] to include or a N [No] to exclude the Look-Up Table from the report.
Field Name: Output Device
Select the output device for the report. CONsole is your video monitor, PRNter is your default printer, LPT1 & LPT2 are parallel ports, COM1-4 are serial ports, and DSKfile is a text file on your hard disk. A DiSKfile is useful for browsing through the report with the Text File Editor (Utilities Sub Menu) or editing in any text editor or word processor.
Field Name: Lines per Page
This setting MUST match the printer that the report will be printed on. Some printers use a Lines per Inch (LPI) and a top and bottom margin setting. The following example shows how to calculate Lines per Page: The printer is set for 6 LPI with 1/4" top AND bottom margins. The paper is 11" long. Lines per Page = (11-1/4-1/4) times 6, which is 63.
Field Name: Graphic Line Draw
Setting this to N (No) will allow compatibility with printers that have the wrong CHARACTER SET selected as default. If you get weird characters where a line should be, either set this to N, or change your printer's default CHARACTER SET to a LINE DRAW or GRAPHIC CHARACTER set. See your printer manual for details.
Field Name: Copies
Enter the number of copies to make of this report.
Field Name: FileName
If the report is sent to a DiSKfile, enter the FileName here.
Custom Printer Setup
General Information
If you need to troubleshoot a printer problem, see Trouble Shooting Printer Problems section. It is very rare to need to create a custom printer definition (driver). We know of no customer that has found this necessary. We provide it to insure compatibility with any printer that was, or might be made in the future. If a printer is not working with the generic printer driver correctly, go back to Trouble Shooting Printer Problems.
Modifying and/or Adding Printer Driver Files
When the Printer Types Available window is in view, there is a list of pre-defined printers. The command menu is at the bottom of the screen. There are choices on the menu called Items and Models. Selecting these options effectively toggles which window (Item or Model) the remaining functions shown on the command menu will operate.
Next Moves the highlight bar to the next record in sequence.
Prev Moves the highlight bar to the previous record in sequence.
Find Allows you to select a record from the database or shows you the whole database in a
find window from which you can choose a record.
Top Moves the highlight bar to the first record in the database.
Last Moves the highlight bar to the last record in the database.
Edit Changes a line in the current window. Press <F10> to save the record and end editing.
Add Adds a line to the current window. Press <F10> to save the record and stop adding.
Copy Copies the highlighted record to make a new record, allowing you to edit the copy.
Delete Deletes a line from the current window. (You will asked to confirm the deletion)
Models Window
ID: This is a sequence number of the printer model description. When you add a new model description the program automatically allocates the next available number.
Printer Model Name: A name or description you enter to distinguish this printer model from others.
Items Window: Enter the codes which control the functions of the printer. There are four columns.
Style ID is a one-character code (used in reports) to define the print style.
Style ID Codes:
C for compressed
P for portrait
L for landscape
B for bold (NOTE: bold is the only special code currently used)
N for normal
R for reset
Print Style: Give the printer code a name in order for you to remember the function that this code performs. (e.g. Bold)
Codes to Activate Style:
The actual codes, which you will find in your printer manual, can be in the following forms:
Hexadecimal for example: $1B, $45
Decimal for example: #27, #69
ASCII for example: Esc, 'E'
or a combination... for example: Esc, #69
#27, 'E'
Esc, $45
#27, $45
$1B, 'E'
$1B, #69
Please note: In editing mode, you can use <F2> to select the ASCII table window. Move the mouse or arrow keys to make your selection, then press <Enter> or the left mouse button.
Codes to Deactivate: The actual codes are entered in the same manner as codes to activate style.
When you have completed all the codes for a particular line, press <F10> to save that record. When you have entered all items required, press M (Models) to toggle to the models window to add another model or terminate the printer description program by pressing Q(Quit), <Esc> or <Alt>+<X>. Use S (Select) to select the appropriate printer before leaving the program.
Import/Export Utility
General Information
Please note that this utility is for advanced database users only. Exporting of data to a Comma Delimited Basic Sequential file for import to your spreadsheet program is not too hard once you figure out how to define which fields from what records you wish to export. IMPORTING runs the risk of corrupting your DATAFILES! Make sure you have backed up your data! Importing is usually best done using the Comma Delimited Basic Sequential format. This enables you to edit the file in a text editor PRIOR to importing so you can make the data compatible with the MTrack file sizes and format. Remember to Rebuild the Indexes after an Import!
This is the (text) Import/Export utility. Throughout these instructions it will be referred to by it's DOS filename XDBTXT. It facilitates transfer of data between the ".DBF" database file format and ASCII text files.
Note: The import phase of the XDBTXT utility cannot create database files; it can only append data to existing ".DBF" files. During installation of Maintenance Tracker, you were presented an option of initializing the data files. This essentially copies empty data files (.DBF) to your MTrack sub-directory. If for some reason you deleted all your .DBF files and want to import, simply reinstall and select the above mentioned option.
The Interactive Mode for XDBTXT
The program opens with the following screen. (Note the current delimiters and terminators displayed near the top.)
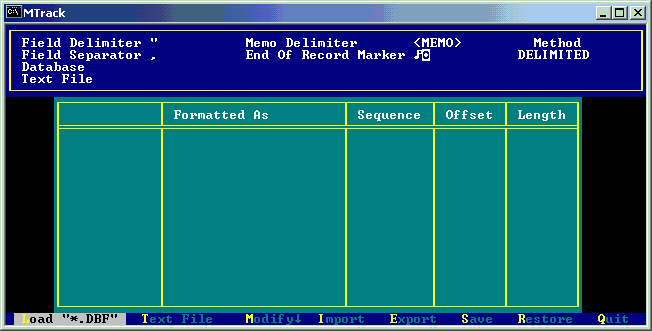
There are two menus (both appear on the bottom line). The primary menu (as seen above), and the "Modify" sub-menu,
which has the following items:
Edit Method Field Delimiter Field Separator Memo
Delimiter End Of Record
The Primary Menu
Load " *.DBF" Load an existing database file
Select the data file from which you are going to export records, or to which you want to append (import) records read from a text file. Use the <F2> function key to invoke the "Directory Pick" box. If you want to overwrite an existing file (rather than append to it), you will first have to create an empty ".DBF" file. A way to create an empty file is to delete the ".DBF" in question (and its associated ".DBT" memo file if there are any memo fields), and then run the MTrack Database. (Note: The Equip. / Job Database will not start unless the Validation DBF files exist, so run the Validation Database first.). When the program is unable to open a file because it is not there, it will create a new empty database file.
Text File Specify the name of the text file (to export to/ import from)
The "Text File" is the name of the file to which, or from which the database records are being transferred. Use the <F2> function key to invoke the "Directory Pick" box.
Modify Change the field information and default settings
This activates the "Modify" sub-menu which has option to let you make changes to the field table information as well as the record and field delimiters (and terminators), and the format of the text file, (Delimited or Fixed Length).
Import Import Data
Processes the "Text File," reading the fields on that line (DELIMITED), or in that block (FIXED LENGTH), into a database record buffer, then appending that record to the database data file.
Export Export Data
If the "Text File" already exists then you will be asked if you want to "Overwrite" it. Answer "N"o, or press <ESC> if you do not want to overwrite, otherwise the "Export" will begin, reading the records in the database file and transferring the nominated fields to the "Text File".
Save Save Information in the Field Table
"Save" creates a text file into which all the information relating to the current export/import is written. You are prompted for a name, (default is <filename>.SV1). If it already exists you can overwrite it or press "N"o or <ESC> to terminate the operation. It is this type of file (a specially formatted ASCII text file) that must be passed to the program when run in "Automatic" mode.
Restore Restore a saved record information file
Select a text file (usually <filename>.SV1) that contains data about how the fields of a file can be exported/imported. The ".SV1" files are usually created by the "Save" facility. The currently loaded ".DBF" file has its field table information modified according to the setup saved in the ".SV1" file. The information restored covers the fields, their format and sequence (or offset and length); the text file mode (DELIMITED or FIXED), and all the delimiters and terminators.
Quit Finish the program
When you have completed all the importing and exporting select "Quit" to return to the calling menu (or DOS).
The "Modify" sub-menu
Edit Edit the Field Information Table
You will be able to change the way the data in the text will appear by modifying the "Formatted As" specification. If the text file in "DELIMITED" then you will be able to change the field sequence numbers, and if the text file is "FIXED LENGTH" then you will be able to change the "Offset" and "Length". Note that you can also change the Date Format. To change between the columns press the <TAB> key. When a Date Field is selected, pressing F2 will bring up a selection box of various date formats. The UP and DOWN cursor keys scroll through the fields.
Method Change the text file format specification
The possible export/import text file modes are DELIMITED and FIXED LENGTH. A "choose" box lets you select the method you want to use.
DELIMITED text files look like:
"James","Citizen",140000,19580703
"Joe","Bloggs",33000,19680212
FIXED LENGTH text file look like:
James Citizen 14000019580703
Joe Bloggs 3300019680212
Field Delimiter Set the field delimiting string
The field delimiter is the character string that appears at either end of character fields in DELIMITED text files. Usually this is just a single character, the double quote, (").
NOTE: Field delimiters are not used for numeric, date, or logical fields, or in FIXED LENGTH text files.
Field Separator Set the field separator string
The field separator is the character string that appears between each field in a DELIMITED text file, this is usually just a single character, the comma (,).
NOTE: FIXED LENGTH text files do not use field separators.
Memo Delimiter Set the memo delimiter string
The memo delimiter is the character string, usually more than one character that marks the start and end of a memo field. You should select a memo delimiter that will never appear as text within the memo. Memos are exported with ".DBT" formatting characters intact. If you view an exported memo files then it will probably look awkward for this reason. If you want to use it in an editor that does not emulate ".DBT" editing then you will need to delete the extra characters, reformatting the text as you go. Memos that are imported to a ".DBT" file from a text file that does not contain the ".DBT" formatting characters will be formatted automatically by the editing and display routines of the MTrack program.
NOTE: Because memo field are of variable length it is not possible to have memos in a FIXED LENGTH text file.
How to specify where the text record ends
DELIMITED
In a Delimited text file the records appear one to a line, so the line is terminated with a "Carriage Return" + "Linefeed" pair. These two characters have ASCII values 13 and 10 respectively.
FIXED LENGTH
The Fixed Length records end is determined by the number of bytes in each record. The records in the text file may or may not end in a <CR>+<LF> pair; in the cases where they do, these characters simply contribute two more bytes toward the record size.
End of File Marker
If a text file import is performed, there MUST be a <CTRL><Z> (ASCII26) at the end of the file to indicate the end of file.
Appendix A Maintenance Tracker Tutorial
Requirements
Maintenance Tracker and the sample datafiles must be installed on your computer. You should read the Introduction to Maintenance Tracker, and the section titled The MTrack Main Menu prior to taking this tutorial.
Throughout this tutorial we will use the default Logon names and Passwords that are supplied with MTrack. If these names and passwords have been changed, contact the person responsible for this program for access. Substitute the Logon names and passwords as appropriate. The tutorial has been written in an outline format to make following along easier.
General information:
Menu items can be selected by pressing the key corresponding to the character (usually the first) with a different color or by moving the hi-lite cursor with the arrow keys to the item and pressing <Enter>. For mouse users, the left button emulates the <Enter> key and moving the mouse emulates the arrow keys. Additionally, some of the pull-down menu items have hot-key combinations that will perform the particular function without having to pull down a menu. The hot-keys are shown to the right of a menu item where applicable. This tutorial uses a mix of these techniques. As mentioned earlier, our convention is to refer to special keys on your keyboard with their name in < > like this: <Enter> or <PageDown>. When you are instructed to press or type characters, we will capitalize them with an extra space on each side like this: Press L to Logon.
Starting MTrack using the sample datafiles
ü DOS command prompt method
Type SAMPLE <Enter> from your MTRACK program directory (C:\MTRACK). .
ü From Windows Explorer
Double click on SAMPLE in the MTRACK program directory (C:\MTRACK). To toggle from a window to full screen and back, press <ALT> <ENTER>.
The Validation Database
The data in the validation database determines the available entries for their respective fields in Equip/Job Tracker and Work Order Tracker. If you modify an existing entry in the Validation Database, you must also change each occurrence of that entry accordingly in the various MTrack modules. This is why EDIT (and DELETE) security is set for level 9 in the Validation Database. Security level 2 is required to ADD a record in the Validation Database.
1. Press V to start the Validation Database Module.
2. Press <PageDown> eight times and view each look-up table. Start thinking about what Locations (Area/Sub-Area), Departments, Systems, Equipment Types and Maintenance Groups your plant will have. We recommend that Areas and their Sub-Areas be physically separate places. The System table is the place to distinguish equipment or jobs by plant systems, for example "Service Air" or "Fire Protection". The Department table defines each workgroup in your plant and Equipment Type is used to generally categorize equipment. Maintenance Groups are typically used for "Event Driven Maintenance". This is the maintenance that happens not as the result of some predetermined time interval, but because an event has triggered it. A good example is "Unit 1 overhaul". All the records for equipment maintenance necessary for Unit 1 overhaul would be assigned to that group. When it's time, just print out the records for the "Unit 1 Overhaul" Group (either full record or in a list format). Each Equipment/Job record may belong to up to three Groups and still retain its "Time Driven" preventative maintenance capability. Window 7 is for Part Categories. This Look-Up table is used to limit the available entries in the part category field within Parts Tracker to allow effective searching when a part number, manufacturer, vendor, etc. is not known. Parts Categories can also be edited from Parts Tracker. Window 8 is for Tech Manual Prefixes. This two character field is used to prefix Tech Manual numbers. If prefixing is not desired, include a blank entry in this Look-Up table. Tech Manual Prefixes can be edited from within Tech Manual Tracker. Window 9 is for Drawing Keywords. This Look-Up table is used, and can be edited, from Drawing Tracker. The Keyword Look-Up is typically used to group related drawings.
3. Press F to activate the FILE MENU.
4. Use the up or down arrow keys or your mouse to hi-lite "Departments", then press <Enter> or the left mouse button. Notice that you could have either used <PageUp>, <PageDown>, or the FILE MENU to select this datafile.
5. Press <Esc> to remove the FILE MENU. Try the up and down arrow keys. Notice that they move the hi-lite in the Department look-up table.
6. Press R for the RECORD MENU and read the available choices and their equivalent hot keys. Press the up and down arrow keys. Notice that they move the hi-lite cursor in the RECORD MENU.
7. Press the key combination <Ctrl>+<RightArrow> and <Ctrl>+<LeftArrow>. Notice that the hi-lite cursor in the Department look-up table moves up and down. This hot-key for the next and previous record is mainly used when you want to move the cursor in the datafile with a menu pulled down.
8. Press <Esc> to remove the menu.
9. Let's try some of the hot-keys you read from the RECORD MENU. Press <End>, then <HOME>. The last and the first records are selected.
10. Notice that the EDIT MENU is grayed, and its menu cannot be viewed. This is because we have not logged on with a security level that allows editing of these datafiles.
11. Press <Alt>+<X> to exit, then <Enter> to confirm. You may also exit from the FILE MENU.
Tech Manual Tracker
In order to use Tech Manual Tracker effectively, manuals should to be put in file folders or notebooks, and each folder or notebook given a unique number. The Manual Number may have a two letter prefix that uses a Look-Up in Window 2, and a one letter suffix. The manuals are then kept in alphanumeric order so they can be easily found. You may also list the same manual number several times with different manufacturers or descriptions so people searching by different key words will find the manual. Most plants will print indexes sorted by Manufacturer and Description, then leave the printed indexes close to where the manuals are kept for easy reference.
1. Press T to start Tech Manual Tracker.
2. Press R for the RECORD MENU. Notice the menu items are the same as the Validation Database. Despite each module's different function, the menu systems and hot-keys are similar and work in a similar fashion.
3. Press <Esc> to remove the menu.
4. Notice that the records are in alphanumeric order according to their manual number.
5. Pretend we are searching for a manual for a Honeywell recorder. Press the hot-key combination for Search/Index, <Alt>+<S>.
6. Using the up and down arrow keys hi-lite "MFG", then press <Enter>. (This selects the Manufacturer field to index on.)
7. Press HO <Enter> ("HO" are the first two characters in Honeywell). At the "Enter Key" prompt you may just press <Enter> and get a list to choose from sorted by selected index, or you may enter all or part of the manufacturer to find.
8. Since you entered "HO", and there is only one manufacturer starting with "HO", note that you are returned to database window with the Honeywell manual selected.
9. Further note that the order of all the records is now based alphanumerically on manufacturer.
10. Press <Home> and <End> noting that they select the first and last records in this indexed order.
11. Press <Alt>+<S> again, hi-lite "MFG", then press <Enter>. At the "Enter Key" prompt press <Enter>.
12. You are now viewing a list of records, ordered by manufacturer. Press H . Notice that Honeywell is now selected. Use the <backspace> key to erase the H . Now press W . The first manual beginning with a W is selected. <Backspace> to erase the "W".
13. Press the key combination <Alt>+<Z> to zoom out and make the list full screen. Press <Alt>+<Z> again to zoom back in.
14. Press the up and down arrow keys to scroll the list up and down.
15. Press the left and right arrow keys to scroll the list left and right. This is very useful when there are more characters on each line than can be viewed on one line.
16. Select any record and press <Enter>.
17. Press R to activate the Record menu.
18. Move the cursor to Multi Search, then press the HelpKey <F1>. After viewing the Help Window, Press <Esc>.
19. Activate Multi-Search (by pressing <Enter>). At the prompt type FAN
20. When the cursor finds a record, press <Esc> to stop Multi Search, then press <Esc> again to remove the Record menu.
21. Press <PageDown> to view the Prefix Look-Up table in window 2.
22. Before you exit, you may want to try some more searches. Press <Alt>+<X> to exit, then <Enter> to confirm. You may also exit from the FILE MENU.
MTrack Database Terminology
This is a good time to explain the terms DATAFILE, RECORD, and FIELD. A datafile is a collection of records, and a record is made up of one or more fields. In the Tech Manual DATAFILE there are five FIELDS per RECORD. The fields are Manual Number, Prefix, Suffix, Manufacturer and Description/Model. Notice that since there are only five fields per record so it's fairly easy to view more than one record at a time. As you will see, in other modules there are many fields in each record and only one record can be viewed at a time. However, when searching, the list of records will still use the tabular, one line per record format. We have used this database as our tutor for searching because it is easy to see how the search will index the records, allowing you to find the desired record(s). Remember, searching in the other MTrack modules uses the same techniques you have learned here.
Parts Tracker
While progressing through this section keep in mind how Parts Tracker can be used in your situation. Although it's quite capable with a capacity of almost 1 million parts records (999,999), many plants already have a system that is working just fine in their warehouse. In this case, Parts Tracker is most often used to organize the parts kept in your shop.
1. From the MTrack main menu press P to start Parts Tracker.
2. Press F to activate the FILE MENU and view the selections.
3. Hi-lite "Category Look-Up" and press <Enter> to view window two.
4. Hi-lite "Parts Database" on the file menu and press <Enter> to return to window one.
5. Press <RightArrow> and view the RECORD MENU. Notice the "Print Main Record" item.
6. If you have a printer connected to the computers default printer port (usually LPT1), select "Print Main Record" and press <Enter>. (The "Notes" section will not print via this method.) This will also work on network printers when LPT1 has been re-directed. If you use a serial printer on a COM port, you may use the DOS MODE command to re-route LPT1. (For example, from the DOS prompt type MODE LPT1=COM1 if the printer is connected to COM1. This command may be added as the first line to the batch files that start MTrack, MTRACK.BAT and SAMPLE.BAT or added to the AUTOEXEC.BAT file.)
7. Press <RightArrow> again to view the EDIT MENU. Notice the only available option is "EDIT" with the hot-key <Ctrl>+<Enter>.
8. Press <Esc> to remove the menu.
9. Pretend that we need a 600 volt diode to fix a Burnsall power supply. The manufacturer's part number for the diode is 1N12345. Press <Alt>+<S> to Search/Index, then select "Part #1 ..." <Enter>. At the "Enter Key" prompt type 1N1 <Enter>. As previously explained, the record with the cursor hi-lite is the first record with 1N1 as the first characters, the records are ordered by "Part #1", and the <LeftArrow> and <RightArrow> keys scroll the view left and right. Don't forget that you can make the list of records window full screen with <Alt>+<Z>.
10. Select part # 1N12345 and press <Enter>.
11. Let's search another way. Press <Alt>+<S> to Search/Index. Select "Mfg of Equip ..." <Enter>. At the "Enter Key" prompt type BUR <Enter>. Select the 600 volt diode and press <Enter>.
12. From the record we can tell how many are in stock, where the part is located, its description, etc. Let's pretend we took a diode from the bin, and must update the database. Press <Ctrl>+<Enter>.
13. Note the current Quantity in Stock. Type 1 in the "Subtract from Qty. in stock" field. If you press <Enter> you will zero the "Subtract from Qty. in Stock" field and the Quantity in Stock will be reduced accordingly. If you made a mistake, pressing <Esc> will abort all changes. If you're ready to save the record, press <F10>. You could have, instead, skipped pressing <Enter> and simply pressed <F10> to save the changes. Please notice the RED help box in the lower right corner of the screen that lists the keys <F1> for help, <F10> to save and <Esc> to abort.
14. "Add to Qty. in Stock" works in a similar fashion except that you may also elect to reduce the "Amount on Order" (if any) by the amount added to stock. These are the only fields available for editing with our present security level (zero). We will exit now and return with a higher security level.
15. Press <Alt>+<X> to exit, then <Enter> to confirm.
16. From the MTrack main menu, press L to logon, type USER1 <Enter>, then at the password prompt type 1 <Enter>. You are now at security level one. Most users who are allowed to edit data should be at security level one. Level two adds quite a bit more responsibility, as we will see later.
17. With the hi-lite cursor still on "Logon", press <F1> for help. Remember, context sensitive help is available everywhere the cursor is, in every MTrack module. Press <Esc> to exit the help window.
18. Press P to start Parts Tracker again.
19. Let's edit the record that is shown on your screen. Note that the initial indexed order for the records is on "Part ID #". The record shown is that with the lowest "Part ID" number. All MTrack modules have a similar initial default.
20. Press <Ctrl>+<Enter> to edit the record.
21. Press <DownArrow> until you have the vendor phone selected.
22. Change the vendor phone number to something different.
23. Press <DownArrow> until you have the "Notes" field selected. (The cursor should be in the "Notes" window.)
24. Press <DownArrow> until the cursor is at the last line of text.
25. Press <End> to move the cursor to the last character in the line. (You could have used the <RightArrow> key, but we're trying to show you shortcuts. Pressing <Home> will move the cursor to the left margin.)
26. Start typing (your name, testing 123, anything). Notice the word wrap feature so that you don't have to press <Enter> at the end of each line. Also note that more lines are available than can be seen outside the editing mode. These additional lines will be seen when printing reports.
27. To move the cursor out of the "Notes" window press <Ctrl>+<PageDown>. The "Notes" window is a "memo field". Memo fields in all MTrack modules work the same way.
28. Save the changes to the record by pressing <F10>. (Note: You could have pressed <F10> at the previous step to save the record. Pressing <Esc> will abort all changes to the record.)
29. Adding a record is very similar to editing. Let's add another sample record. Press <Insert>.
30. Press <DownArrow> until the cursor is at "Part Location", which is typically where you will start when adding a new record.
31. Fill in all the fields you care to, then press <F10> to save the record. Note the "Part ID #" for the record you just added.
32. Play with Parts Tracker a little and get used to it. Try editing an existing record, using Multi Search, copying a record, etc. When you feel you understand how to use Parts Tracker, exit back to the MTrack main menu.
33. Back at the MTrack main menu, let's logoff. Press L to Logon, then press <Esc> twice to abort the logon. You are now logged off.
Unique Numbers
Every record has a unique Part ID # assigned when it is added. This field may be edited, but only if your security level is two (or greater). MTrack will not allow more than one part to have this number. If another record is already assigned this number an error message will result when you attempt to save the record. The reason this field has such high security is because companies typically start using this number outside of MTrack for reference, and there is no reason other than personal preference to change it.
Every time a record is added the default Part ID # is incremented by one. The default is incremented EVEN IF the record is aborted and not saved. Likewise, Part ID numbers for deleted records are NOT automatically reused.
If your security level is 2 (or greater), you may reset the default Part ID # for the next record added from the EDIT menu. Make sure you set this greater than the largest Part ID # currently in the database.
In the other modules, "Tracker ID" and "Work Order #" work exactly the same way as "Part ID #" does in Parts Tracker.
Parts Tracker advanced tutorial (Security level 2 users only)
1. From the MTrack main menu, press L to logon, type USER2 <Enter>, then at the password prompt type 2 <Enter>. You are now at security level two.
2. From the MTrack main menu press P to start Parts Tracker again .
3. Press F for the FILE menu
4. Press C for the Part Category window. Note that entries in this table are the available choices for the Category Field in the Parts database.
5. Press <Esc> to remove the FILE menu.
6. Press <DownArrow> and <UpArrow> to scroll through the entries.
7. Press <Insert> to add a new category.
8. Type Telephone to create a category relating to telephone equipment. Note: The Category field is used to index and search by when you can't find the part with a search based on part number(s), manufacturer(s), or vendor. Keep this use in mind when adding entries to the Category look-up table.
9. Press <F10> to save the record.
10. Press <PageUp> to get back to the Parts database.
11. Press <Alt>+<S> for Search/Index.
12. Hi-lite "Part ID #" then press <Enter>.
13. At the "enter key" prompt press <ESC>. (This aborts the search, but still indexes the records by Part ID number.)
14. Press <End> to view the last record in the current indexed order.
15. Note the "Part ID #" for the record, then press E for the EDIT menu. (This is the largest part ID number in the database.)
16. Hi-lite "Set default Part ID #" and press <Enter>.
17. Type in a number (one) greater than that noted previously as the largest Part ID number. Pressing <Esc> will abort any change. Press <Enter> to accept the change. In Equip/Job Tracker and Work Order Tracker the default "Tracker ID" and "Work Order #" is set exactly the same as default "Part ID #" in Parts Tracker.
18. Exit Parts Tracker by pressing <Alt>+<X> then <Enter> to confirm.
19. Back at the MTrack main menu, let's logoff. Press L to Logon, then press <Esc> twice to abort the logon. You are now logged off.
Work Order Tracker
Maintenance Tracker is very flexible. The data in an Equipment/Job Record may be all that's required for scheduled maintenance, or perhaps you will want a Work Order referencing the Equipment/Job record. Maybe you'll want to print both, then staple them together. Some customers use Work Order Tracker to initiate corrective maintenance, while others use it to track their existing paperwork system. Some users will delete a work order when it's complete, some keep work orders that contain important information indefinitely. Keep these options in mind as you begin this section.
1. From the MTrack main menu press W to start Work Order Tracker.
2. Press F to view the selections in the FILE menu.
3. Press <RightArrow> to view the selections in the RECORD menu.
4. Press <RightArrow> again to view the selections in the EDIT menu. Note that without a Logon security level we can only add a Work Order, and only certain fields will be editable.
5. Press <Esc> to remove the pull-down menu.
6. Press <DownArrow> and <UpArrow> to view the sample work orders. Note that the default index order is by work order number, which is divided into two parts, the year portion left of the decimal point and the number portion right of the decimal. If your present paperwork system does not use the year in numbering work orders, just refer to the numbers to the right of the decimal point.
7. Press <Alt>+<S> to Search/Index.
8. Hi-lite "Comp Date / Priority" then press <Enter>.
9. At the "Enter key" prompt press <Enter>. (Note that you could have entered a "completed date" if you were looking for a completed work order.)
10. The sample work orders are now listed in a window. Work orders that are not completed are shown first in order of priority. Completed work orders are shown next in order of completion date. Press <RightArrow> to see data off the right side of the window. Press <Alt>+<Z> to expand the window to full screen.
11. Hi-lite a record and press <Enter>.
12. The selected Work Order is now in view, and all work orders are indexed in the order mentioned previously.
13. Press <Insert> to add a work order.
14. With the cursor at "Priority" press <Enter> and accept the default of 1, the highest priority.
15. With the cursor at "Department", press <F2>. Notice that a window appears with available choices from the Validation Database. Hi-lite your choice and press <Enter>. (Note that you could also have simply typed in your choice when the cursor was at "Department".)
16. Enter some sample data in the remaining fields that allow entry. When you've finished editing the "Problem / Work Requested" memo field, either press <F10> to save the record, or <Ctrl>+<PageDown> to leave the memo field and continue editing. If you continue editing, press <F10> when you're ready to save the record.
17. If you had logged on with security level 1, you would have been able to edit all the fields except Work Order #. With security level 2 you would be able to set the default number for the next Work Order as well as edit the "Work Order #" field.
18. Searching with other indexes is similar to the previous example. Try some searches on your own.
19. Exit Work Order Tracker by pressing <Alt>+<X> then <Enter> to confirm.
Equipment/Job Tracker
This is the heart of Maintenance Tracker. This is the place to store calibration data, settings, procedures, safety information, as well as the data that there are specific fields for. Historical information for each record is also stored here. With a maximum of over 2 billion history records, you should have no trouble keeping track of equipment history. Keep in mind that the reason certain fields have look-ups in the Validation Database is to make searching and report filtering easy and consistent.
1. From the MTrack main menu, press L to logon, type USER1 <Enter>, then at the password prompt type 1 <Enter>. You are now at security level one. Most users who are allowed to edit data should be at security level one.
2. Press E to start the Equipment/Job Tracker.
3. Press F to view the selections in the FILE menu.
4. Press <RightArrow> to view the selections in the RECORD menu.
5. Press <RightArrow> again to view the selections in the EDIT menu. Note that with security level 1 we have all privileges except for setting the Default Tracker ID # (for the next record added) and editing the Tracker ID #.
6. Press <Esc> to remove the pull-down menu.
7. Press <DownArrow> and <UpArrow> to view the sample records. Note that the default index order is by Tracker ID number.
8. Examine all the fields to become familiar with the information typically stored in these records.
9. Press <Home> to get to the first record in the current index (Tracker ID #).
10. Press <PageDown> to go to the "Notes" for that record. When reports are printed, this memo field will be included with the data in the previous "Main Record" .
11. Press F for the FILE menu. Note the selections available. We are currently in the "Record Notes" file.
12. Hi-lite "History" and press <Enter>.
13. Press <Esc> to remove the pull-down menu.
14. Press <DownArrow> and <UpArrow> to view the maintenance history for the equipment. The Equipment/Job Record is considered the "Parent" to these "Child" (History) Records.
15. Notice that when simply viewing the next and previous records, as done in the previous step, you are confined to viewing the child records of a particular parent. However, searching knows no such bounds!
16. Press <Alt>+<S> to Search.
17. Hi-lite "Maint. Person" and press <Enter>.
18. At the "Enter Key" prompt type D then <Enter> to start our search for names beginning with "D."
19. This works like the other searches, so pretend you're looking for some work "Del" did in, say, mid- June of 1994. Hi-lite the record and press <Enter>.
20. Notice that the parent record in the background window has changed to match the selected History Record.
21. Press <PageUp> twice to get back to the Main Record.
22. Press <Alt>+<S> to Search/Index the Main Records.
23. There are many ways to search! That's why we started with the less complicated modules first. Hi-lite "Dept .. PM Due" then press <Enter>.
24. At the "Enter Key" prompt type I then press <Enter>.
25. The "List Box" contains all the records sorted by Department. Those records with the same Department are sorted by their PM Due Date. The first record with a Department beginning with an "I" is initially selected.
26. Press <Enter> to select the hi-lited record. As with all MTrack modules, the records are now ordered by the previously selected index ("Dept .. PM Due").
27. A new record is added the same way as in the other modules. Press <Insert> to add a new record.
28. Enter some sample data into the fields. When there is a look-up to the Validation Database, you will get a window of available choices if your entry is not a match, or press <F2> for a list of available choices. At the Drawing and Tech Manual fields you can also press <F2> for a list of Drawings or Tech Manuals entered in Drawing Tracker or Tech Manual Tracker. Note that the "Equipment Data" section is NOT a memo field. Use <Enter> to go to the next line.
29. When you've finished editing the new record, press <F10> to save it.
30. Press <PageDown>. Notice that your new record has no notes.
31. Press <Insert> to add a new record. (Each Main Record is only allowed one note record. If a note record already existed, you would choose "Edit" from the EDIT menu or press <Ctrl>+<Enter>.)
32. This is a memo field that has word-wrap. Pressing <Home> or <End> will move the cursor to the beginning or end of a line. Write some instructions or safety information here for your sample entry.
33. Press <F10> to save the record.
34. Press <PageUp> to get back to the Main Record.
35. Press <Alt>+<P> to "quick print" the Main Record. This is also available under the RECORD menu.
36. Let's see how to copy a record. Most users should create some records specifically to use as templates for copying. This can save you a great deal of time. Our sample database has two records that are examples of sample forms. To find them press <Alt>+ S to search, then select "Area .. Name" and press <Enter>. At the Enter Key prompt type SAMP then <Enter>. Select the sample form for the "Inst. & Control" department and press <Enter>.
37. To copy this record press <Ctrl>+ <C> (This option is also available from the EDIT pull-down menu.)
38. You may now fill in the various fields for this new addition to the database. Change the Area, Sub-Area, Equipment Name, etc. When you get to the "Equipment Data" portion of the form, you will only have to fill in the output values. Even if you're not familiar with electronic instrumentation, you can see that this technique of creating a template for commonly used equipment types saves time and gives a consistent look to your records.
39. Press <F10> to save this record.
40. Press E for the EDIT menu.
41. Press D to delete the record.
42. Press <Esc> to abort the deletion.
43. At this point you know enough to be dangerous! Actually, you know enough to continue on your own. Try searching with some of the other indexes, use Multi Search, or add some maintenance history to your new record. Try the on-line help before you exit...
44. Press <F1>. You will get context-sensitive help based on the position of the cursor.
45. Press <F1> again to use the on-line manual.
46. Press <F1> once more to get help with using the on-line manual.
47. Press <Esc> to remove the on-line manual help window.
48. Press <F8> to view the table of contents.
49. Press the <UpArrow>, <DownArrow>, <PageDown>, or <PageUp> keys to select a page to go to, then press <Enter>.
50. Press the <UpArrow>, <DownArrow>, <PageDown>, or <PageUp> keys to view the manual. Note the help text for using the manual at the bottom portion of the window
51. Press <F9> to view the index.
52. Press the <UpArrow>, <DownArrow>, <PageDown>, or <PageUp> keys to select a page to go to, then press <Enter>.
53. Press <Ctrl>+<P> to print.
54. Hi-lite "Print Overview" then press <Enter>.
55. Press <Enter> to accept the default destination of "PRN" if your printer is connected to, or output is redirected from, LPT1. Otherwise enter your printer port name. The overview should now be printing.
56. Press <Esc> twice to return to where you were.
57. Press <Alt>+<X> to exit, then <Enter> to confirm.
58. Back at the MTrack main menu, let's logoff. Press L to Logon, then press <Esc> twice to abort the logon. You are now logged off.
Drawing Tracker
Drawing Tracker works much like Tech Manual Tracker. The Keyword Look-Up is accesed in window 2.
1. From the MTrack main menu press D to start Drawing Tracker.
2. Press F to activate the FILE MENU and view the selections.
3. Press <RightArrow> and view the RECORD MENU.
4. Press <Esc> to remove the menus.
5. Press <PageDown> to view the Keyword Look-Up table.
6. Press <PageUp> to go back to the Drawing Database.
7. Press <Alt>+<M> for Multi Search, then type PUMP at the prompt. Each time the cursor stops, note where the characters PUMP are, then press <Enter> to continue searching until the last record is encountered.
8. Press <Alt>+<S> to Search/Index, then choose Drawing # to index by.
9. Type E at the "Enter Key" prompt, then press <Enter>.
10. The records are now ordered by Drawing Number. You can now view the entire 75 character Description field by using the <RightArrow> and <LeftArrow> keys. Place the cursor on a drawing and press <Enter> to select it.
11. Press <Alt>+<X> to exit, then <Enter> to confirm.
Printing Reports
1. Reports are generated in separate modules. Reports may be sent to a printer, the console (monitor), or a file. When you send a report to a printer, you are actually sending it to a port on your computer, so you must specify which port. Additionally, you must specify how many "lines per page" your printer is set for.
2. If you have not selected a printer driver, see the "Printer Setup" section in the manual. You can use this tutorial as a means for testing your printer.
3. From the MTrack main menu, hi-lite "Print, Search & Sort" and press <Enter>.
4. Hi-lite "Equip. / Job Searches & Sorts" and press <Enter>.
5. Here we may choose either "Full Record Report" or "List Format". The "Full Record Report" prints the entire record including the notes for the record. The "List Format" is more like a checklist.
6. Hi-lite "Full Record Report" and press <Enter>.
7. This is where we sort out what we want to print, and to where. Let's imagine that we want to print out records for all the PM's due by 07-01-1994 for all Departments and Areas.
8. Press <DownArrow> until the cursor is at "PM's Due by."
9. Type 07/01/1994 .
10. Press <DownArrow>, accept the default sort order, press <DownArrow> again, then press <Enter> at the "Output Device" prompt. Select "Con " to send the output to the (video) console for a "test drive." This can save a lot of paper. Press <F10> to view the report on the computer monitor.
11. Press any key to continue the screen printing, or press <Esc> twice quickly to abort.
12. Back at the menu, press <Enter> to run this report module again.
13. This time we want to select only those records in the Mechanical Dept. due by 07/01/1994. Enter Mechanical for the Department name and 07/01/1994 for PM's due by. If you misspell "Mechanical" you will get a window to choose a department from (you can press <F2> for a list also). Also change the "Sort Order" field from "Dept" to "Area". This will cause the records to be printed in order of their Area & Sub-Area rather than by their Department. Select "Con " as the "output device", then Press <F10> to print to your computer console.
14. Press any key to continue the screen printing, or press <Esc> twice quickly to abort. If there are no records matching this search criteria, don't worry--someone has edited (or deleted) some of the sample records.
15. Back at the menu, press <Enter> to run this report module again.
16. Now that you understand how you may select records, let's actually print to your printer. Enter some search criteria that will result in at least two records being printed.
17. At "Output Device" press <F2> to list available choices. Choose the device where your printer is connected. (Nine out of ten times choosing "PRN" will work.) See "Printer Setup, Troubleshooting" in your manual if you have problems printing. Communication with printers is designed to be flexible enough to accommodate the wide variety of printers available today, as well as in the future.
18. Now comes the hard part. How many lines per page is your printer set for? If you need some help, press <F1>. If you enter the wrong number here, the reports will not start at the top of a page correctly. If you don't know what the printer is set for, try 60 or 66--they are the most common settings.
19. Next is "Graphic Line draw" Y/N. If your printer's character set includes line draw characters, select Y. Most printers have a graphic character set available. If your printouts contain Greek where a line should be, either set this option to N or adjust the printer's settings. Press <F1> for help.
20. The FileName option is only used when printing to a disk file.
21. Press <F10> to start printing.
22. Rather than walk you through every Print, Search & Sort available, we will outline them below and let you experiment with them.
Available Reports
ü Equipment/Job Record searches & sorts (in either list or full record format) [equipment/job tracker]
Select records based on any combination of Area, Sub-Area, Department, PM due date, or a single Tracker ID.
Select sorting by Department, Area, or Tracker ID number.
ü Equipment/Job Record searches by Group (in either list or full record format) [equipment/job tracker]
Select records based on any combination of Department, Area, Sub-Area, or Maintenance Group.
Select sorting by Department, Area, or Tracker ID number.
ü Equipment/Job History [equipment/job tracker]
Select History records for a given Equipment (Tracker ID), and a date range for the History records to include.
ü Work Orders (in either list or full record format) [work order tracker]
Select records based on any combination of Work Order number, range of numbers, Department, Area, or completion status.
ü Tech Manual Indexes [tech manual tracker]
Select an index to print based on Manufacturer, Description/Model, or Manual number.
ü Parts Records [parts tracker]
Select a single record based on Part ID number.
Select all records whose quantity in stock is less than or equal to their re-order quantity.
Select all records whose quantity in stock is less than or equal to their re-order quantity, with zero as the quantity on order.
ü Drawing Indexes [drawing tracker]
Select an index to print based on Drawing number, Sub-Area, or Keyword.
Select Drawings for a specific Sub-Area.
ü Look-Up Tables [validation database]
Select which (or all) Look-Up Tables from the Validation Database to include in the report.
MTrack Setup / Utilities
1. From the MTrack main menu, press L to logon, type SYSOP <Enter>, then at the password prompt type MASTER <Enter>. You are now at security level nine, which is the highest level. If you are not able or allowed to have level nine security, either contact the person responsible for this program in your plant, or do what you can with the security level you have.
2. Press M to select MTrack Setup / Utilities.
3. A sub-menu will appear with any choices not available to you (because of insufficient security) grayed. Press T for "Text File Editor".
4. The MTEdit editor should have started. Press <Alt>+<F> then O to select a file to open.
5. Select README.TXT from the file dialog window. Press <F1> to view the "Help" screen that explains functions of MTEdit. MTEdit is a very easy-to-use text editor with a self-explanatory menu system. The following is a quick "How to ..." for some of the features. To resize a window with a mouse, drag the lower right corner. To resize a window with the keyboard, select "Size/move" from the "Window" menu, then hold the <Shift> key while pressing the <Arrow> keys, finally press <Enter> to end the resize operation. To move a Window with a mouse, drag the top to the desired location. To move a Window with the keyboard, select "Size/move" from the "Window" menu, use the <Arrow> keys to position, finally press <Enter>. To make a Window the active window either click on it with a mouse, or select "Next" <F6> or "Previous" <Shift>+<F6> from the "Window" menu. Files are printed in the background, from a file on disk. When editing, save the file to disk prior to printing.
6. Press <Alt>+X to exit. If you made some changes to the README.TXT file, you will be asked if you want to save them. A minor note: if you change a file, the previous file will be saved and re-named with a .BAK extension. This is a handy feature for the "keyboard challenged" (the politically correct term for those who hit key first... think later).
7. Back at the MTrack Utilities menu... Press S for "Set Data Path". Here you can change the drive and/or directory in which MTrack will look for the data files. The path for the datafiles is passed to MTrack when you start Maintenance Tracker via a batch file. Normally this batchfile is MTRACK.BAT; however when you started MTrack with the sample datafiles you used SAMPLE.BAT. Included within the batchfile are instructions for setting the path for the datafiles. The "Set Data Path" option allows you to switch datafiles after MTrack has started. This is a rarely used option, but it's there if you need it.
8. Press <Esc> to abort changing the datapath. Note the current datapath is displayed at the lower left portion of the screen.
9. The next option "Video Settings for Database" allows the user to customize the appearance of some of the database fields when they are active (selected), inactive, or in edit mode. Users rarely want to change the default so we will skip this. As a reminder, MTrack can be started in monochrome mode by including the -LCD parameter when starting MTrack. This may be helpful for some older portables with poor LCD displays.
10. Press R for "Rebuild Indexes", then select "Tech Manual Tracker" by pressing T .
11. Press <F10> to rebuild the indexes for the Tech Manual database. This is rarely required, but may be necessary if power is lost while saving a record. In a network environment you will not be allowed to rebuild the indexes if (at the same time) another person is using the datafiles.
12. After the indexes are rebuilt press any key to return to the MTrack Menu.
13. Printer setup is covered in detail elsewhere in this manual. See "Printer Setup" and "Custom Printer Setup" in the table of contents.
14. In a network environment backing up is usually done automatically. The MTrack backup and restore utilities are provided for stand-alone computers that are not backed up regularly by any other method. You can backup to either removable or fixed disks. Tip: If your datafiles are to large to fit on one floppy disk, you can use a utility such as the MS DOS program INTERLNK (included with version 6 and 6.2) to connect two computers together via serial or parallel ports, then backup directly to the other computer's hard drive. To try MTrack Backup, press B for "Backup Data Files". Note that only level 9 security users have access to Backup, Restore, and Import/Export utilities.
15. The first screen is a guide to MTrack file names. Press any key to continue. You are now warned not to proceed if other users are logged into MTrack in a network environment. Press Y to continue.
16. Follow the prompts and enter a destination path for the backup. If you do not want to proceed with the backup, press <Esc> when you see the prompt "Accept Destination ? [ Y/N or Esc ]".
17. The MTrack Restore program works similar to the Backup program except that you may selectively restore the datafiles for individual MTrack modules.
18. The Import/Export Utility is covered elsewhere in this manual. See "Import/Export Utility" in the table of contents. Besides the ability to import and export delimited and fixed length text files, MTrack uses the standard Xbase (Dbase IV) file format. This file format is the de-facto standard for database files.
Appendix B XBASE files and fields for MTrack
The following is a list of the files and fields in MTrack. Types are C Character, N Numerical, L Logical, D Date, M Memo. Sequence is the order in which the field lies in the .DBF file. Length is the number of characters in the field. Decimal is the number of decimal places in a Numerical field. The field names represent shorthand versions of the names actually used in the Database Windows.
Equipment/Job Database
Record EQDB1.DBF
Name Type Sequence Length Decimal
AREA C 1 15
DATA_0 C 2 69
DATA_1 C 3 69
DATA_2 C 4 69
DATA_3 C 5 69
DATA_4 C 6 69
DATA_5 C 7 69
DATA_6 C 8 69
DATA_7 C 9 69
DATA_8 C 10 69
DATA_9 C 11 69
DEPARTMENT C 12 15
DWG_1 C 13 13
DWG_2 C 14 13
EQUIP_NAME C 15 30
EQUIP_TYPE C 16 20
GROUP_1 C 17 25
GROUP_2 C 18 25
GROUP_3 C 19 25
ID_NAME_2 C 20 30
IN_WK N 21 3
IN_YR N 22 4 1
LAST_PM D 23 8
MANUAL C 24 13
MFG C 25 20
MODEL C 26 20
PM_DUE D 27 8
SERIAL_NO C 28 17
SUB_AREA C 29 15
SYSTEM C 30 20
TRACKER_ID N 31 6
TRAIN C 32 1
UNIT_NO N 33 2
WYN N 34 3 { used for internal calculation only }
Y_N L 35 1
Record EQDB2.DBF
Name Type Sequence Length Decimal
EQUIP_NOTE M 1 10
TRACKER_ID N 2 6
Record EQDB3.DBF
Name Type Sequence Length Decimal
MAINT_DATE D 1 8
M_DESC_0 C 2 40
M_DESC_1 C 3 40
M_DESC_2 C 4 40
M_DESC_3 C 5 40
M_DESC_4 C 6 40
M_DESC_5 C 7 40
M_DESC_6 C 8 40
M_DESC_7 C 9 40
M_DESC_8 C 10 40
M_DESC_9 C 11 40
M_PERSON C 12 25
MEMO M 13 10
PM_OR_CM C 14 2
TRACKER_ID N 15 6
Validation Database
Record VALDB1.DBF
Name Type Sequence Length Decimal
AREA C 1 15
Record VALDB2.DBF
Name Type Sequence Length Decimal
AREA C 1 15
LOC_NO N 2 2
SUB_AREA C 3 15
Record VALDB3.DBF
Name Type Sequence Length Decimal
DEPARTMENT C 1 15
Record VALDB4.DBF
Name Type Sequence Length Decimal
SYSTEM C 1 20
Record VALDB5.DBF
Name Type Sequence Length Decimal
EQUIP_TYPE C 1 20
Record VALDB6.DBF
Name Type Sequence Length Decimal
GROUP C 1 25
Tech Manual Database
Record MAN1.DBF
Name Type Sequence Length Decimal
EQUIP_DESC C 1 33
MFG_NAME C 2 25
NUMBER N 3 5
NUM_PREFIX C 4 2
NUM_SUFFIX C 5 1
Record MAN2.DBF
Name Type Sequence Length Decimal
NUM_PREFIX C 1 2
PRE_DESC C 2 15
Drawing Tracker Database
Record DWG1.DBF
Name Type Sequence Length Decimal
DESC C 1 75
DWG_NO C 2 13
KEYWORD C 3 15
SUB_AREA C 4 15
Record DWG3.DBF
Name Type Sequence Length Decimal
KEYWORD C 3 15
Parts Database
Record PARTS1.DBF
Name Type Sequence Length Decimal
AP N 1 3
CATEGORY C 2 15
DESC_LONG C 3 50
DESC_SHORT C 4 15
MFG_EQUIP C 5 15
MFG_PART C 6 15
NOTE M 7 10
ON_ORDER N 8 3
ORDER_DATE D 9 8
PART_ID N 10 6
PART_LOC C 11 30
PART_NO_1 C 12 15
PART_NO_2 C 13 15
PRICE_EA N 14 9 2
QTY_REORDR N 15 3
QTY_STOCK N 16 3
SIZE C 17 15
SP N 18 3
VEN_ADR C 19 35
VEN_CITY C 20 20
VEN_CO C 21 20
VEN_FAX C 22 10
VEN_PERSON C 23 20
VEN_PHONE C 24 14
VEN_STATE C 25 2
VEN_ZIP C 26 5
YN L 27 1
Record P_CAT1
Name Type Sequence Length Decimal
CATEGORY C 1 15
Work Order Database
Record WODB1
Name Type Sequence Length Decimal
AREA C 1 15
ASSIGN_TO C 2 25
CMPLTD_DAT D 3 8
DEPARTMENT C 4 15
EQUIP_NAME C 5 35
PREFORMED M 6 10
PRIORITY N 7 1
PROBLEM M 8 10
SUBMIT_DAT D 9 8
SUB_AREA C 10 15
SUB_BY C 11 25
UNIT_NO N 12 2
WO_NO N 13 5
WO_NO_YEAR N 14 4
WO_NUM N 15 10 5
Appendix C List of files in data directory
Directory of C:\MTRACK\DATA (Typical DataFile alphabetical directory list)
DWG1.DBF EQDB3.K1 VALDB1.K1
DWG1.K1 EQDB3.K2 VALDB1.K2
DWG1.K2 EQDB3.K3 VALDB2.DBF
DWG1.K3 EQDB3.K4 VALDB2.K1
DWG1.K4 LOC.NUM VALDB2.K2
DWG3.DBF MAN1.DBF VALDB2.K3
DWG3.K1 MAN1.K1 VALDB2.K4
EQDB1.DBF MAN1.K2 VALDB3.DBF
EQDB1.K1 MAN1.K3 VALDB3.K1
EQDB1.K10 MAN1.K4 VALDB3.K2
EQDB1.K11 MAN2.DBF VALDB4.DBF
EQDB1.K12 MAN2.K1 VALDB4.K1
EQDB1.K13 MT.NUM VALDB4.K2
EQDB1.K14 MTRACK.MAN VALDB5.DBF
EQDB1.K15 MTRACK.MEN VALDB5.K1
EQDB1.K16 PARTS.MEN VALDB6.DBF
EQDB1.K2 PARTS1.DBF VALDB6.K1
EQDB1.K3 PARTS1.DBT WO.NUM
EQDB1.K4 PARTS1.K1 WODB1.DBF
EQDB1.K5 PARTS1.K2 WODB1.DBT
EQDB1.K6 PARTS1.K3 WODB1.K1
EQDB1.K7 PARTS1.K4 WODB1.K2
EQDB1.K8 PARTS1.K5 WODB1.K3
EQDB1.K9 PARTS1.K6 WODB1.K4
EQDB2.DBF PARTS1.K7 WODB1.K5
EQDB2.DBT PT.NUM WODB1.K6
EQDB2.K1 P_CAT1.DBF WODB1.K7
EQDB3.DBF P_CAT1.K1
EQDB3.DBT VALDB1.DBF
85 file(s)
DataFiles: Their prefixes, and suffixes
Prefixes:
(The number following the prefix indicates the file number.)
EQDB Equipment/Job Tracker
WODB Work Order Tracker
VALDB Validation Database
PARTS Parts Tracker
P_CAT Parts category lookup database
MAN Tech Manual Tracker
Suffixes:
.DBF XBASE (Dbase IV) data file
.DBT XBASE (Dbase IV) memo file
.K?? Index file
.NUM Default sequence number file
.MAN On-Line manual file
.MEN MTrack menu definition file
Appendix D Common Questions & Answers
Q I just installed MTrack and I get the error message “check if any files are missing or that the disk is not full”. The disk is not full, nor are any files missing.
A Add FILES=80 to the C:\CONFIG.SYS file for
DOS, Windows 3.x or Windows 9x. Add
FILES=80 to C:\WINNT\SYSTEM32\CONFIG.NT for Windows NT or 2000. See the section regarding CONFIG.SYS and CONFIG.NT.
Q I just installed MTrack and I can't enter data in some of the fields in Equipment/Job Tracker, Work Order Tracker, or Parts Tracker. What wrong?
A You will need to enter data in the Look-Up tables in the Validation Database first. These tables are used as a list of available entries in some of the more critical fields to enhance searching and reporting as well as speed data entry. See the sections titled Introduction and Validation Database (VALDB).
Q How do I print the records in Equipment/JobTracker that are due for PM?
A All reports are done through the "Print, Search & Sort" Main menu item. Select "Equipment/Job searches & sorts", then the report format (either list or full record). In the Report Filter enter a date in the PM's due by field, a destination in the Output Device field, then press <F10> to print the report. Most users enter a date slightly in the future so they can plan work ahead of time. See the section titled Equipment/Job Report Filter, or the Reports section for more details.
Q How do I print Work Orders that have not been completed?
A All reports are done through the "Print, Search & Sort" Main menu item. Select "Work Orders", then the report format (either list or full record). In the Report Filter enter a Y [yes] in the Only Incomplete Work Orders field, a destination in the Output Device field, then press <F10> to print the report. See the section titled Work Order Report Filter or the Reports section for more details.
Q Printed reports are not starting at the top of a page, what's wrong?
A There are two possibilities; if the very first page did not start correctly, the printer was not set to start at the top to begin with. This can happen if the last print job did not issue a form feed (MTrack always does) on the last page. Laser printers typically don't actually print a page until they receive a form feed or the page buffer is full, therefore you could have a few (possibly blank) lines waiting to be printed. If the first page starts correctly, and each subsequent page is starting further away from the top, the Lines per Page setting in the report filter is not the same as the printer's Lines per Page setting. Simply change either setting so they match. The report filters remember your last Lines per Page entry, so it will become the default setting. See the section titled Trouble Shooting Printer Problems for further details.
Q How do I search for records, put them in a different order, and view different DATAFILES such as Equipment History? Where is the terminology explained?
A See the section titled The MTrack Command Menu (Database Menus).
Q I can't edit a record, the menu item is grayed and the hot-key (<Ctrl> + <Enter>) doesn't work either. What is wrong?
A Either have not logged on at all, or your security level is to low for the desired operation. See the section titled The MTrack Main Menu or Default Security Settings for details. If necessary, ask whoever is the SYSOP to increase your security level.
Q Can I re-install Maintenance Tracker and keep my existing Data Files?
A Yes, but this is generally only be necessary if some of your program deleted or corrupted due to a computer malfunction or if the SYSOP password has been forgotten. During installation you will be prompted if you want to install the data files. See Installation for details.
Q Can I copy and paste from memo/note fields in MS Windows (any version)?
A Yes, this is an excellent and under-used feature in MS Windows. Run MTrack in a "window". (To change from "full screen" mode to "window mode", press <Alt>+<Enter>.) To activate the clipboard, press <Alt>+<SpaceBar>, choose "Edit", then "Mark". Now either select the area to copy with the mouse, or use the <Arrow> keys to place the cursor in the upper left corner, then hold the <shift key> and press the <Arrow> keys to move the cursor to the lower right corner of the area to copy to the clipboard, then accept the marked area by pressing <Enter>. Back in MTrack, go to the record that you want to add the text into, and put it in the edit mode (from the "edit" menu). Place the cursor exactly where you want the upper left corner of the text previously copied. Press <Alt>+<SpaceBar>, choose "Edit", then "Copy". Presto, you're done. You can copy text from any application to a MTrack memo/note field from the Windows Clipboard. Note that when using MTrack in a window, we recommend using keyboard commands for MTrack instead of the mouse.
Q Can more than one WINDOW in a MTrack module be edited at the same time, on the same computer?
A No, edit the fields in a WINDOW, save the record, then go on to the next.
Q Can users on a network edit the same record at the same time?
A Users on a network may edit different records, but are not allowed to edit the same record simultaneously. A user attempting to edit a record already being edited will receive a "Record in use" message
Q I forgot my password, what do I do?
A If the password for the SYSOP (level 9) has been forgotten, you will have to re-install the software. You will be prompted to install data files, do not install data files if you wish to keep your existing data. Installation will reset the password for the Logon name SYSOP back to MASTER. If the SYSOP knows their password, he/she will be able to assign others a new password via the "Update Password" Main Menu item.
Q I received a "Not Enough Memory" error message. My computer has Mucho RAM installed. What's wrong?
A You need more "Conventional" memory (below 640K). If your running DOS or Windows 3.x, use a Memory Manager to load resident programs above 640K. MS-DOS ver 6.x includes "Memmaker". Other DOS memory managers that provide this feature include 386MAX , QEMM. Windows 9x, NT or 2000 should never have this problem unless “real mode” device drivers are being loaded by mistake.
See the section titled Troubleshooting for information on how to solve common problems, as well as how to contact Technical Support.
Copyright, Trademarks, and License Agreement
Copyright (c) 1995-2000 Triska Technologies. All rights reserved.
Triska Technologies
PO Box 1518, Estacada, Oregon 97023
Web site URL: http://mtrackcmms.com/
Trademarks
Maintenance Tracker, MTrack, Equipment/Job Tracker, Work Order Tracker,
Drawing Tracker, Tech Manual Tracker, Parts Tracker, and MTEdit are trademarks of Triska Technologies.
License Agreement
Maintenance Tracker (MTrack) evaluation version may be installed for 60 days, after which payment and registration are required. Unauthorized use will be prosecuted to the fullest extent possible. By installing the software you agree to the terms of this agreement.
Maintenance Tracker is protected by Copyright Law. The best way to describe our agreement is for you to think of our Software as a "videocassette". The one exception to the video cassette analogy is that you may copy the Software for backup purposes. What do we mean by thinking of our Software as a "videocassette" ? We mean that you may only load the Software onto one (or the number of Licenses purchased) machine at a time. In a multi-user environment, the Software must be capable of only running on one (or the number of Licenses purchased) machine at a time. Just as with a video cassette, you may move it from machine to machine, but you can only be able use or "play" it on one (or the number of Licenses purchased) machine at a time.
The documentation included with Maintenance Tracker contains proprietary information and is also copyright protected. However, the licensee is allowed to copy the documentation for the legitimate use of Maintenance Tracker software.
Limited Warranty
Triska Technologies will replace defective media, or re-send via electronic delivery, for a period of ninety days from the purchase date.
TRISKA TECHNOLOGIES specifically disclaims all warranties, representations, or conditions, expressed or implied, including but not limited to, any implied warranty or condition of merchantability or fitness for a particular purpose. All other implied terms are excluded. Specifically, TRISKA TECHNOLOGIES makes no representation or warranty that the software or documentation are "error free" or meet any user's particular standards, requirements, or needs.
In all events, any implied warranty, representation, condition or other term is limited to replacement of the physical media, or re-sending via electronic delivery, for a period of ninety days.
In no event will TRISKA TECHNOLOGIES liability for any damages ever exceed the lower of the list price, or the actual price paid for the license to use the software, regardless of the form of the claim.